The Hailong battery on the Pino e-bike kit didn’t have a USB outlet and as I use my iPhone for navigating and tracking our rides, an outlet would be useful for keeping the phone charged, as GPS use tends to drain the phone battery pretty quickly.
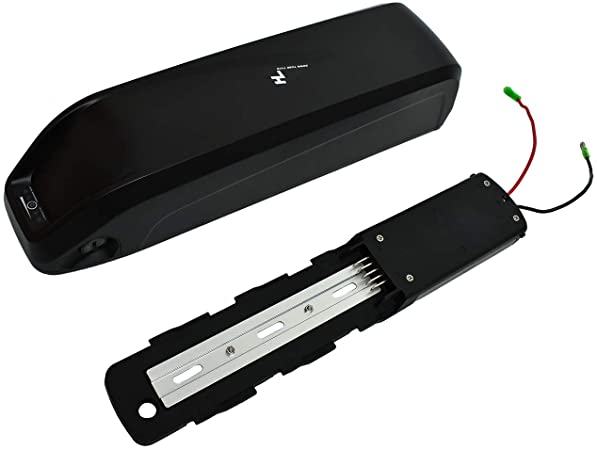
The battery is a 36V 17.5 Ah Hailong.
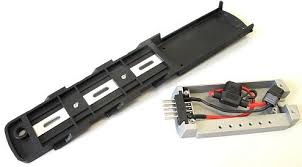
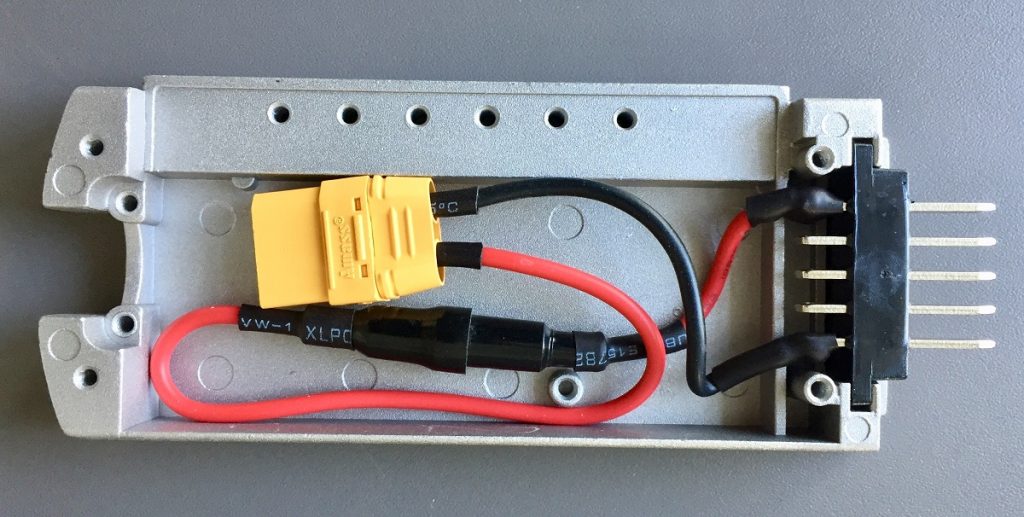
There is a compartment towards the back of the battery mount that houses the connectors and wiring, accessible by removing the four cross-head screws, so that seemed to be the logical place to start.
My battery didn’t have a fuse or large connector, so there was more free space available.
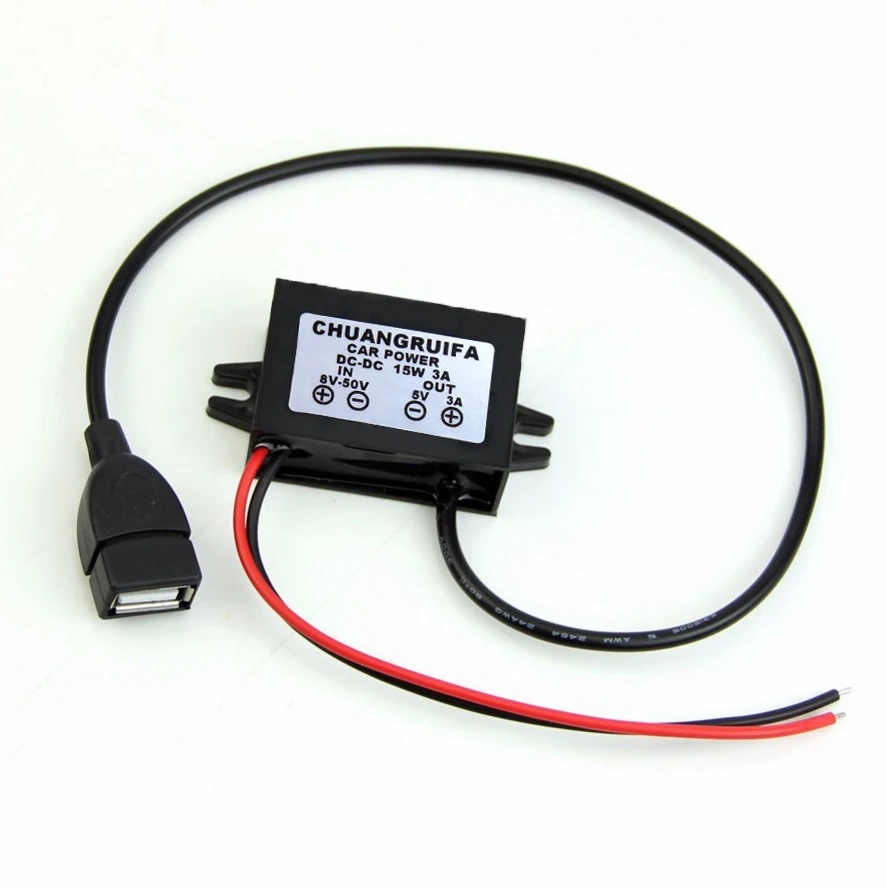
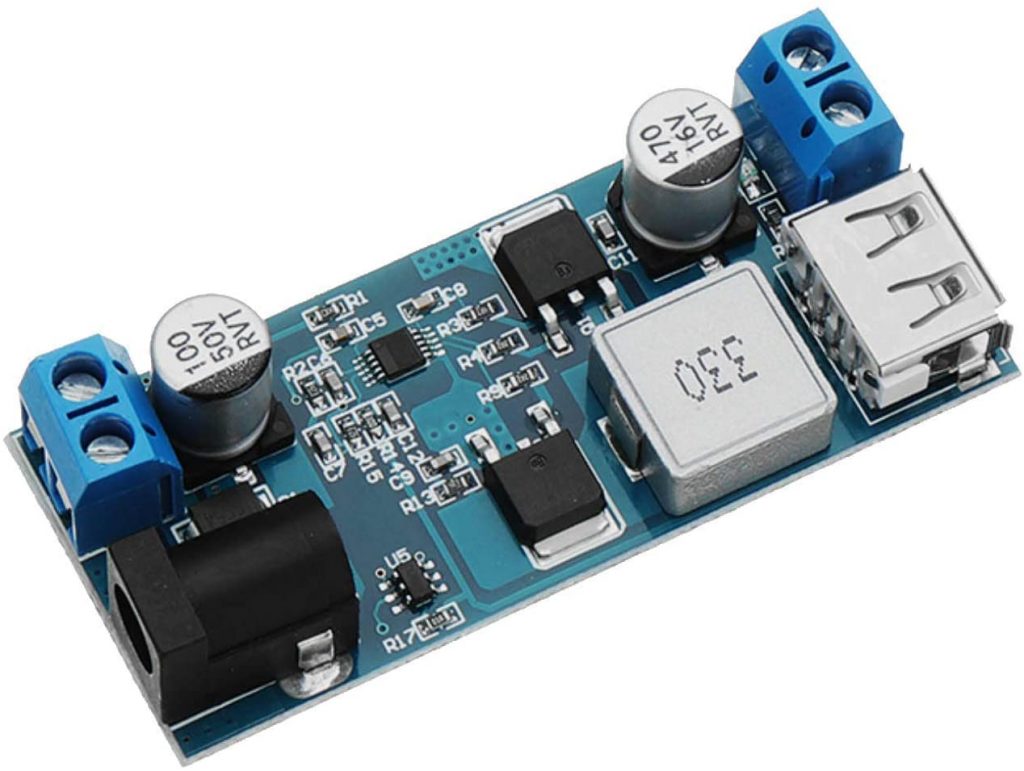
The battery produces 36-39V and a USB phone charge lead needs only 5V at about 2-3 amps. A search on Amazon provided me with a suitable ‘step-down converter’. Input from 8V-50V and output at 5V 3A. It had a USB lead too so seemed perfect for the job.
I removed the battery mounting bracket cover and tapped into the positive and negative outlets on the power supply, then ran a USB lead from the socket up to the handlebars.
The box of tricks was too big to fit inside the mounting bracket, so I zip-tied it to the seat tube. It’s sealed with epoxy resin, so is waterproof. With everything in place, it worked…. for about a minute, then the charge died. Disconnecting it and reconnecting, the same thing happened. Faulty unit, so I got a refund and went looking for an alternative.
This one was cheaper but not sealed. However, it was small enough to fit into the compartment in the battery mounting bracket. I slipped a length of MTB inner tube over it to protect it and prevent any solder on the underside coming into contact with the metal base of the compartment. There’s a USB socket and wiring connectors, so it’s more flexible than the first type I tried and being housed within the mounting bracket makes the whole thing a lot tidier. Better still, it works….
…but not for long. Within a couple of rides it failed, so I have given up on the idea of adding a USB socket to the battery for now.
The year that never was. We had so many plans for 2020 but only managed the first; our early year trip to Spain in search of some winter sun and pleasant riding on the Pino. It’s something we had been thinking about for a while, and I’d seen a programme on the area around Dénia, on the Mediterranean coast. It’s one of the sunniest places in Europe. When some cycling friends of ours said they were headed that way, it made our mind up.
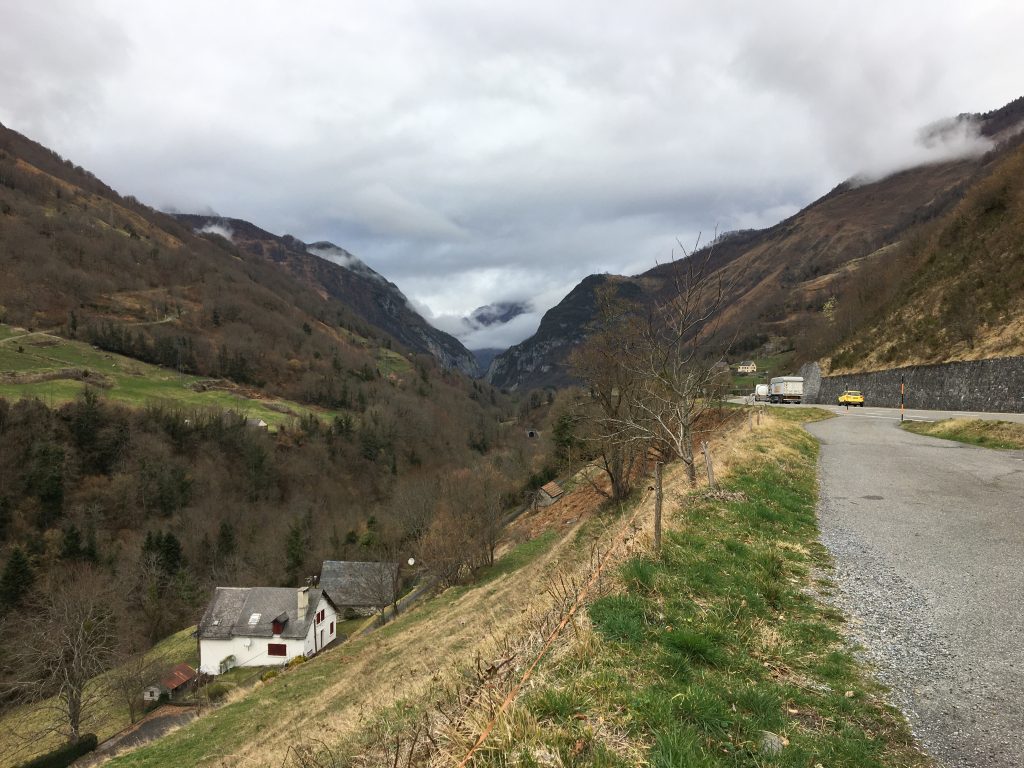
Driving through the Pyrenees
A search on Booking.com for an apartment provided the perfect place for us. It was a few km out of the town, right next to the sea and a lot cheaper than many places in the area. It gave us the flexibility we needed for food as Karon’s diet is not well catered for in most hotels.
I planned a drive and pre-booked some overnight stops for the journey there and back – and that was February taken care of.
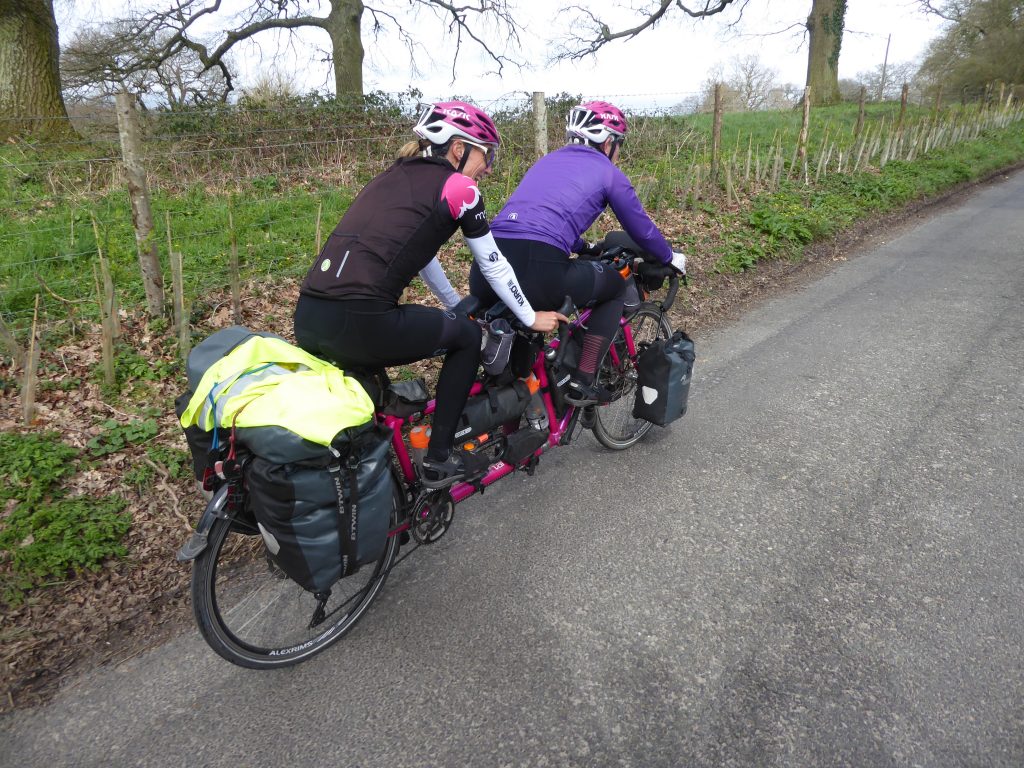
Peter, Ros, Colin and Rosie we know from the Tandem Club
As we travelled back from Spain CV19 was spreading fast through Europe, so it was only a few days and we were into lockdown. With Karon listed as vulnerable, we had to be extra careful, but continued to ride a few times a week for exercise. On one outing in early March we met up with Cat and Raz of TandemWow! as they finished off their epic around the world record-breaking ride. They managed to catch the penultimate ferry out of France! Their route passed close to home, so we planted ourselves on route and tried to keep up and keep company as they headed through our patch.
Cat the Captain and Raz the Stoker on the closing stage of their Global circumnavigation, speeding their way to Oxford and the finish line
From then on, our routine was pretty much the same. I had made one shopping trip the the local supermarket early on in lockdown, but decided not to risk any more. Holland, who was not furloughed did some shopping for us for a few weeks until Karon got Priority status for online shopping.
During the summer months, when things eased a bit, we put the bike in the car and went out to collect a few BCQs in East Sussex, Dorset, Wiltshire, Oxfordshire and Buckinghamshire.
On the hunt for BCQs (British Cycle Quest)
When things tightened up again, we restricted our rides to all too familiar local lanes.
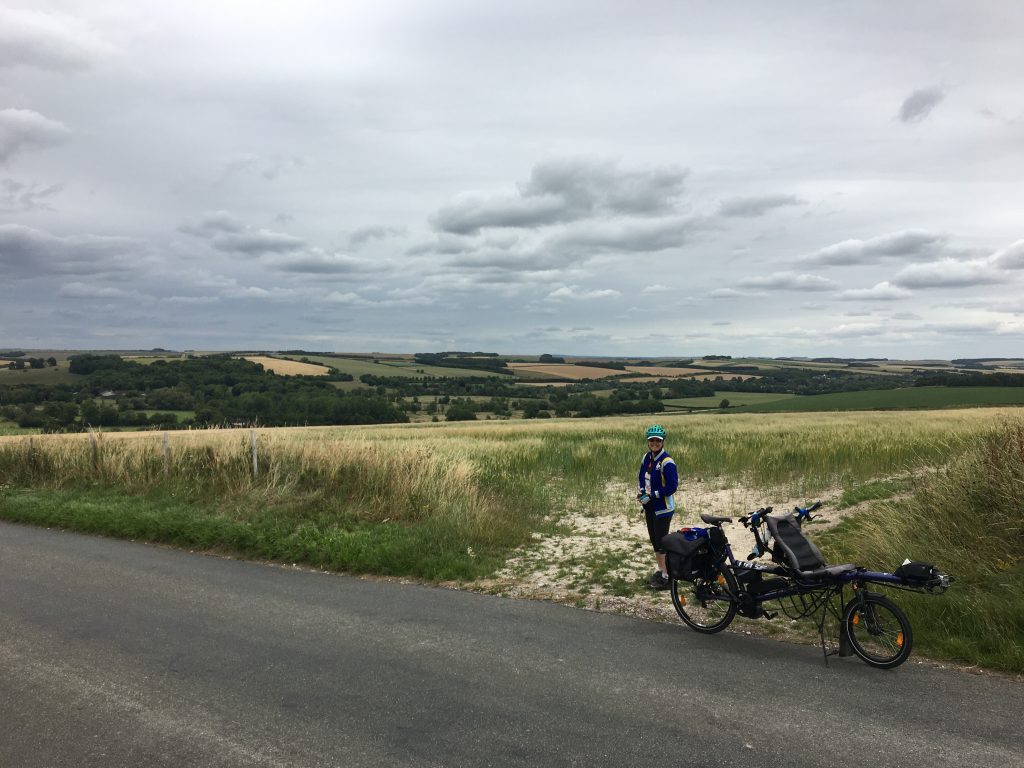
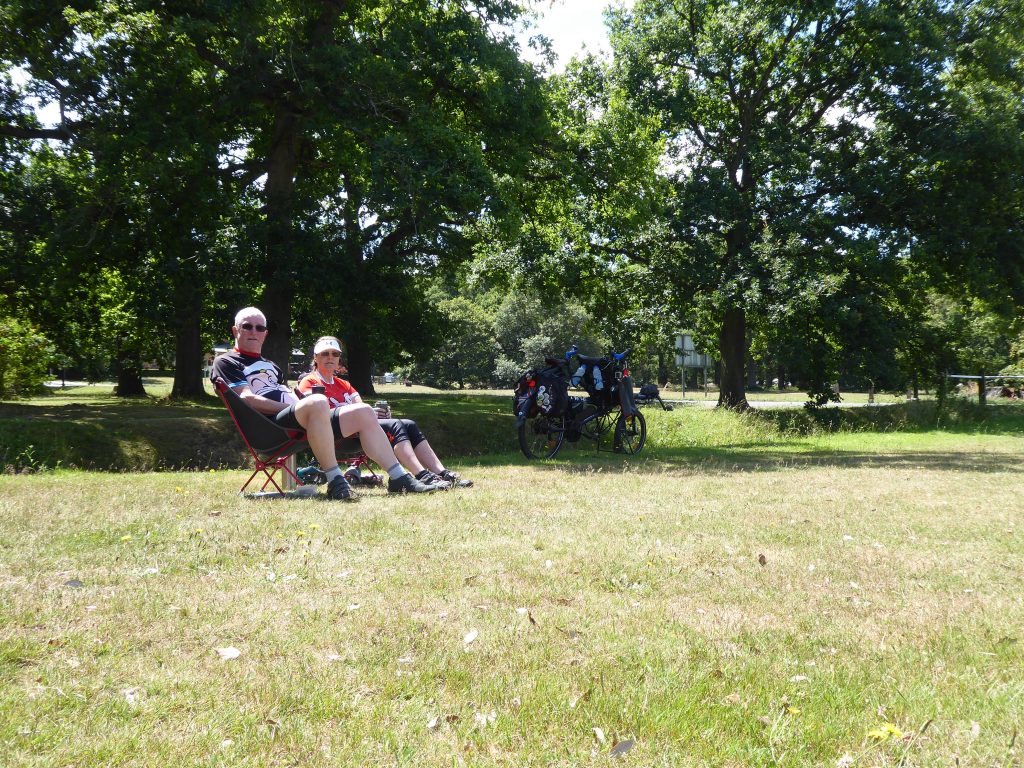
Taking a coffee break at Hartley Wintney
Let’s hope 2021 sees us regain some form of normality when we can get back to travelling further afield with the Pino and cycling in Germany and France again, as well as more BCQ hunting here in the UK.
This is a kind of hobby. I spent six years in the Artillery back in the 70s and we had some impressive kit. At one time I managed a website for ex-members of my unit, as drew up some battle honour crests to put on the website. These generated some interest, so I took it a stage further and started drawing up the guns and support vehicles. Other requests followed…
Some of the military badges I have drawn upSome of my vehicle drawings
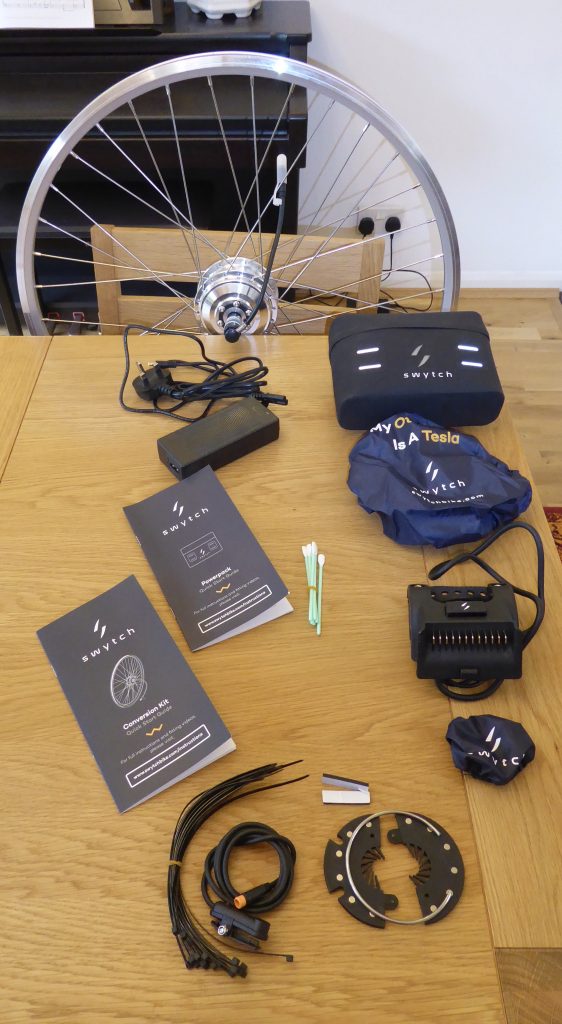
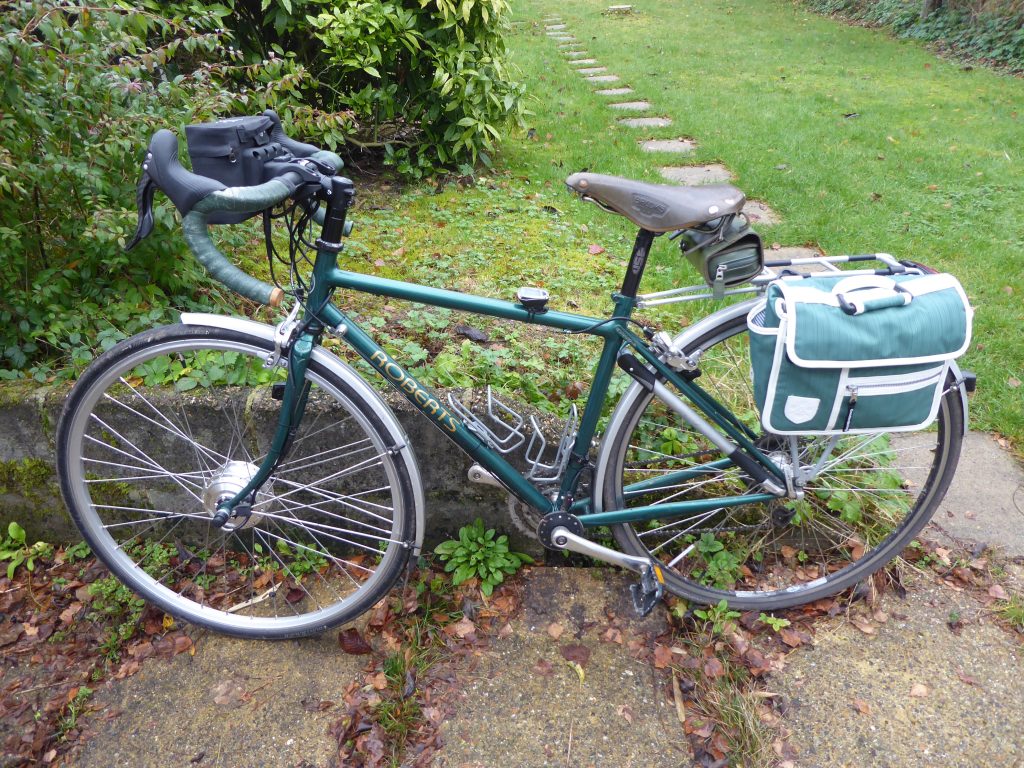
Karon loves her Roberts bike but was rarely riding it, as her health issues made even the gentlest of uphill gradients very difficult for her. We had talked about adding an e-assist kit to the bike for a while, but she didn’t want whatever we chose to change the bike too much, or make it unwieldy. Big batteries and motors are heavy. In the end, I settled on a Swytch Bike kit. It’s a front wheel hub-drive kit with a smallish battery that fits to the handlebars rather that the rear rack or downtube.
The kit motor comes built into the wheel size you specify. You also receive the battery and cover (this version is the ‘Pro’ with more range), the battery handlebar mount and cover and pedal sensor along with plenty of zip ties and two instruction leaflets. Brake sensors and a throttle are shown on the Swytch website and there are connectors for both on the kit, but there doesn’t seem to be a way of buying them online without contacting Swytch.
The ECO kit has a battery capacity of 5.2Ah (187Wh) and an expected range of 35km on medium power. The PRO kit has a battery capacity of 7Ah (252Wh) and an expected range of 50km on medium power.
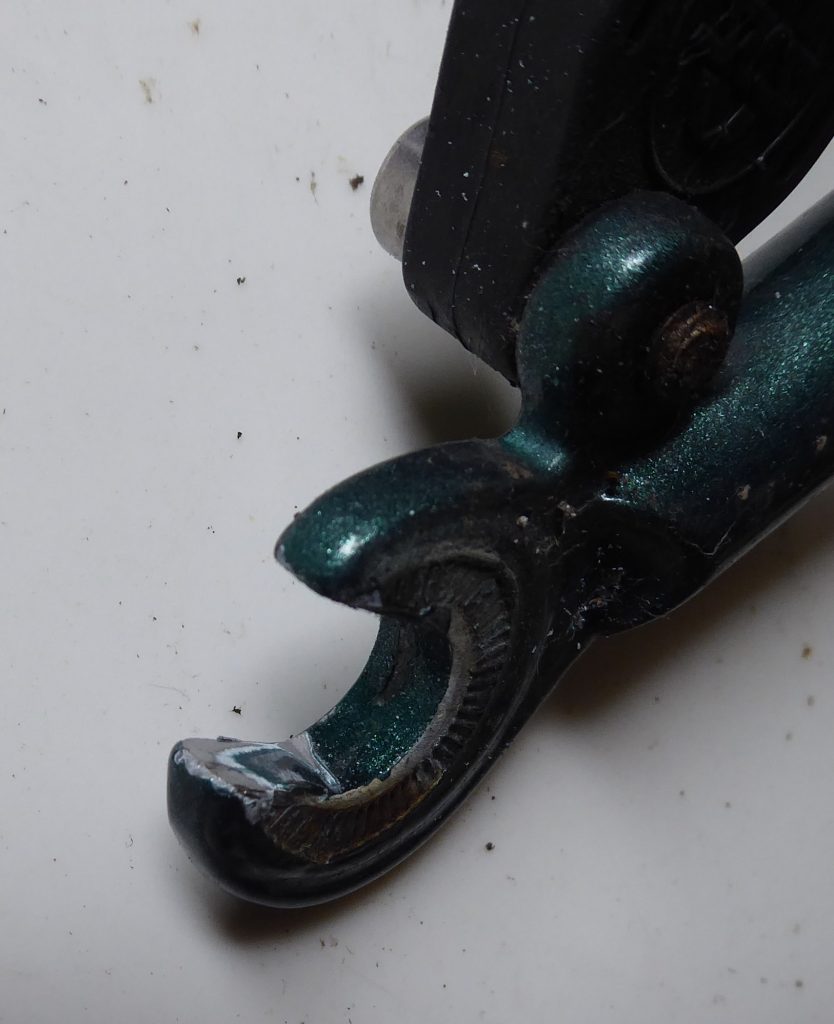
Fitting the kit was straightforward and easy, though I did have to file out the paint from the dropouts on the bike so the axle would fit.
The insides of the dropouts needed filing a little.
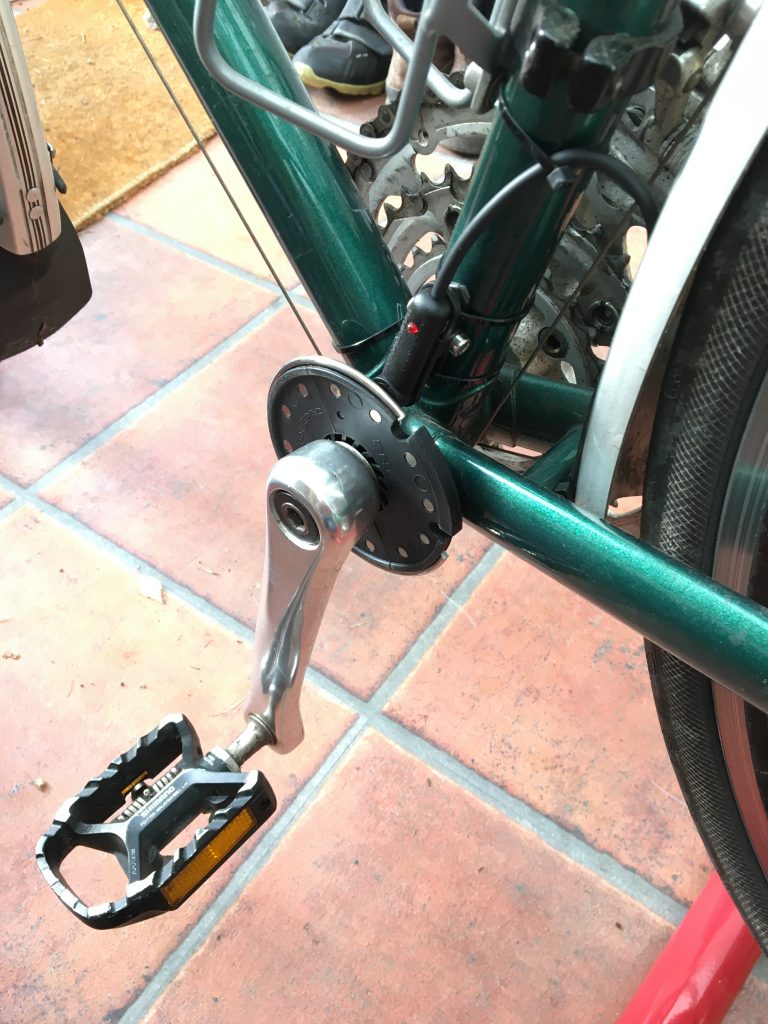
The pedal sensor assembly is very easy to fit as the magnet plate comes in two halves that fit together over the crank and are held firm by a metal ring, so there’s no need to remove the crank arm. The actual sensor is positioned close to the plate in line with the magnets with zip-ties and a sticky pad. I ran the wire up the underside of the down-tube, so it’s not too obtrusive.
The pedal sensor assembly.
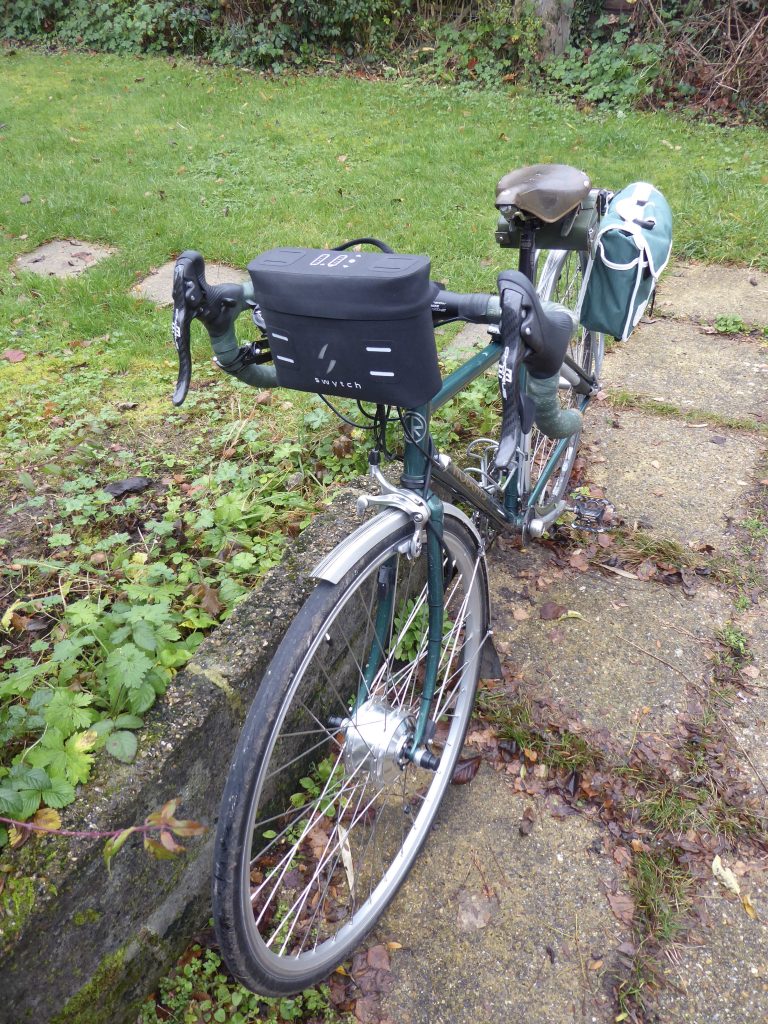
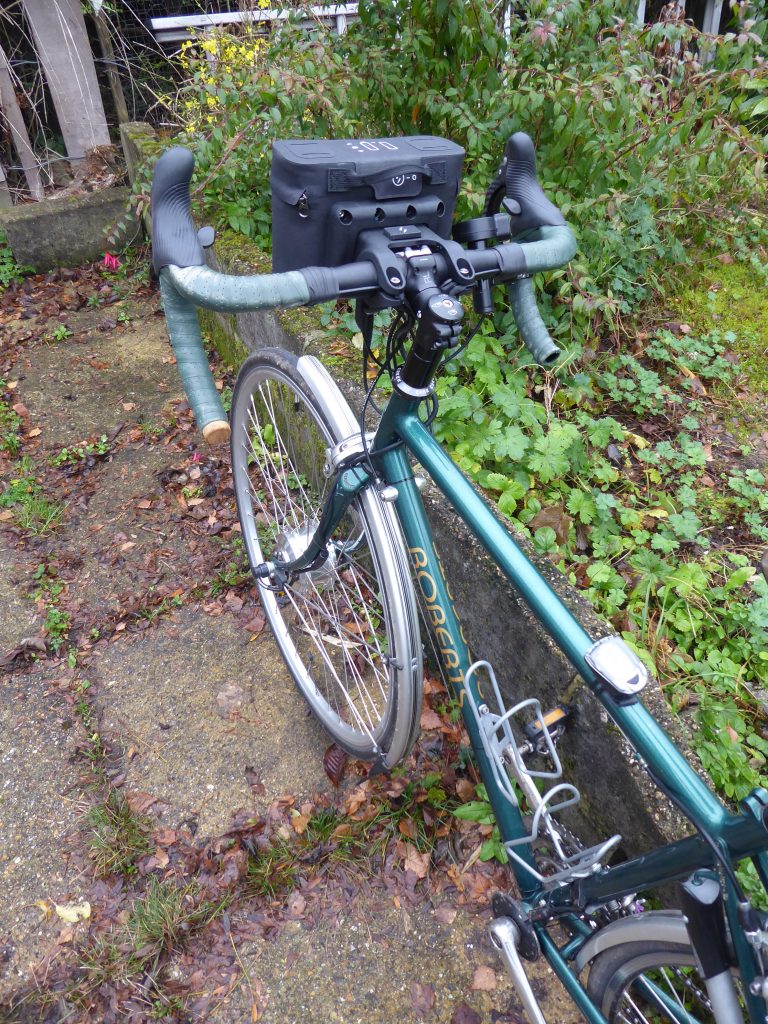
The battery mount clamps to the bars close to the stem and has a strap to prevent the weight of the battery rotating the mount around the bars.
The battery mount.
Once the dropouts had been filed, just a little, the wheel fitted well. The tire that came off the old wheel popped off the new rim but another 28mm 700c tire did fit and inflate without popping off the rim.
I kept the plastic caps that sit over the wheel nuts.Looking down on the battery as you would see it on the bars. On the left is the ‘on/off’ toggle button and the up/down arrows to select one of five power levels. Holding the up arrow down will illuminate the logo on the front of the battery. Changing the setting with gloves may be tricky.
The ECO kit has a battery capacity of 5.2Ah (187Wh) and an expected range of 35km on medium power. The PRO kit has a battery capacity of 7Ah (252Wh) and an expected range of 50km on medium power.
There are five power levels and all will keep providing power until the maximum 25kmh/15.5mph legal (UK) limit is reached. This is different from other e-assist motors I have used, where each power level has a pre-determined speed cut-off, which increases with each power level increase, up to the maximum legal speed on the highest power level. Varying the speed cut-off to match the power level is more flexible in my opinion, and allows for easier power management and therefore more flexibility in optimising the range for each charge.
The illuminated logo is probably ok for making the rider more noticeable but it doesn’t throw sufficient light to use in the dark.
After trying the bike, Karon decided she wanted a throttle as hill starts were difficult in that you need to turn the pedals before the motor kicks in and on a steep hill, she would not necessarily be strong enough to get the bike started. It also makes pulling away at junctions safer, as you can get going and accelerate quickly.
The Swytch throttle is expensive and doesn’t come with the UK kit (as throttles are actually illegal in the UK). However, I bought one online which is essentially the same but a lot cheaper. I couldn’t use the connectors as they didn’t match so I trimmed the wires and soldered them together. There are only three wires and the colours used are similar in the kit and the third party throttle. I used a Minouri bar accessory bracket to position the thumb throttle in the best place.
We had obtained some inline brake sensors to cut power when braking, but in use Karon found she didn’t need them, so I put them on eBay. We also found that the motor/controller interfered with her wireless trip meter, so I moved the sensor for that to the rear wheel and positioned the display further back on the cross-bar.
The bike still looks tidy with complete kit fitted, though all the weight is over the front of the bike, so steering is heavier but it doesn’t affect handling too much.
For the power, the battery is quite large but I do like the way the controller is integrated into it. The kit is also very neat and it would be relatively easy to remove the battery and replace the motor wheel with the bike’s original, as there is a connector on the fork, near the hub. This would leave just the wiring and handlebar mount in place and quickly revert the bike back to almost its original state.
Compared to the 17.5Ah (630Wh) of the Hailong battery on our tandem, the 7Ah battery on the Swytch kit is pretty meagre. Our tandem covered 60 miles on full power before the Battery Management system started reducing power to the motor to protect the battery from draining completely. Using assist only on climbs when needed on the tandem gives us a range of at least 80 miles between charges, often more in ‘easy’ terrain.
With the Swytch kit, Karon estimates that each of the five battery ‘bars’ are good for about 4 miles, so the kit would deliver roughly 20 miles constant use. Obviously using it only on climbs will extend the range to the 30 mile figure quoted by Swytch.
In January 2017 I set about electrifying my HPV Scorpion FS20 recumbent trike. Trikes are great fun to ride, and comfortable too. A lower profile and recumbent position mean they are more aerodynamic, but the downside is their weight. For me, it makes any climb hard going, even pretty innocuous lumps can take some effort. Of course, you can grind away in an ultra-low gear and, with three wheels to keep you upright, you can go as slow as you need to.
After looking at the options of a wheel drive or crank drive, I opted for a crank drive. Wheel drive kits tend to be cheaper than crank drives, but I find the crank drive a more elegant solution. And, If I ever wanted to sell the trike, I could remove the kit, revert the trike and fit the kit to a different bike, regardless of wheel-size. A crank drive will only have a single chainring, but my trike had that already, so it meant I could retain all 27 gears – a 3-speed rear hub gear with a 9-speed cassette fitted.
A Bafang seemed to be the obvious choice. Buying from China, where they are made, is a lot cheaper than sourcing one in the UK or Europe – there are plenty of providers on Amazon but the disadvantage is delivery times are much longer. As I was a bit sceptical about buying direct, I ordered a kit including a 15Ah battery from Woosh Bikes in the UK.
The Bafang kit is very comprehensive and easy to install, thanks to the fool-proof connectors. Instructions are not really needed, which is probably a good thing, as there weren’t any. For those that are doubtful, there are plenty of videos on Youtube about how to install a Bafang…on an upright.
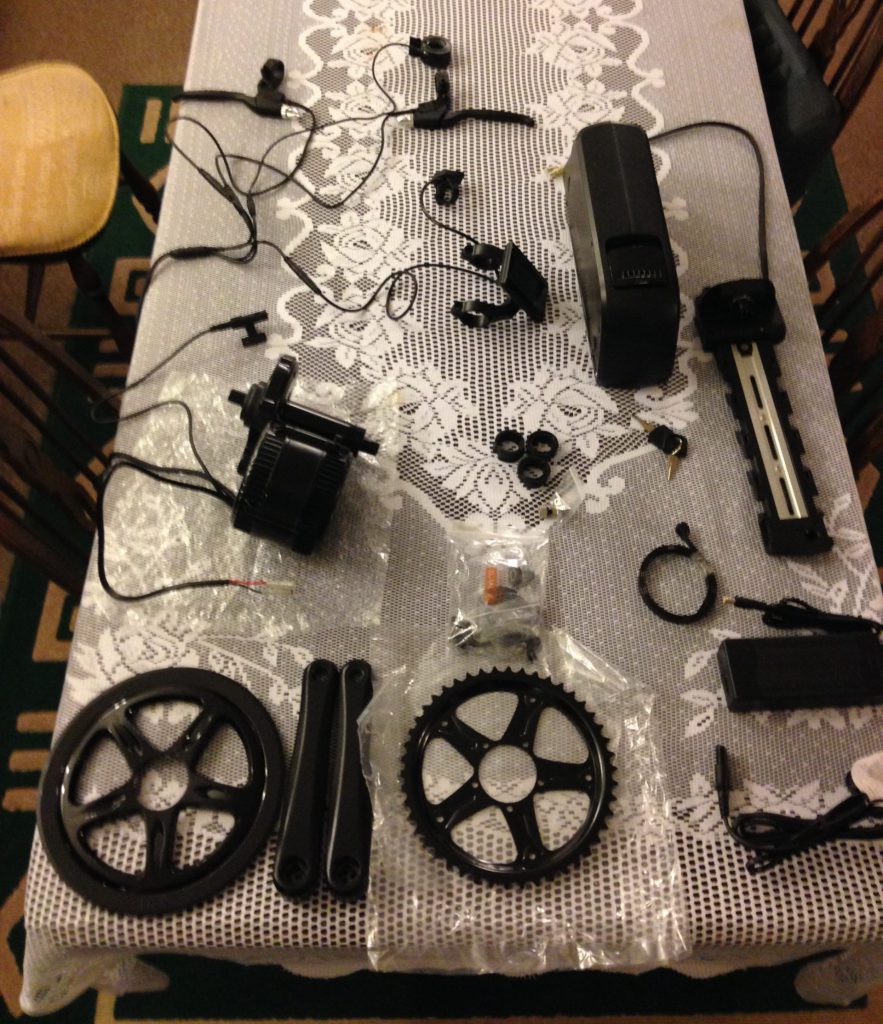
The 250W Bafang crank drive kit laid out. Closest are the chainring cover, cranks and charger. Behind, the motor, spacers, battery with mounting bracket and locking key. Ay the back the thumb throttle, brake levers with sensors and the speed sensor are all connected to the display which has the control buttons permanently wired into it. Excuse the table cloth – I like to keep my workbench looking nice 😉The old BB – a bugger to get out!
First job was the remove the current bottom bracket from the trike. And there I hit the only real problem I had. Even with the right tools, I could not loosen it, so took the bike up the road to my local bike shop, where they dealt with it straight away.
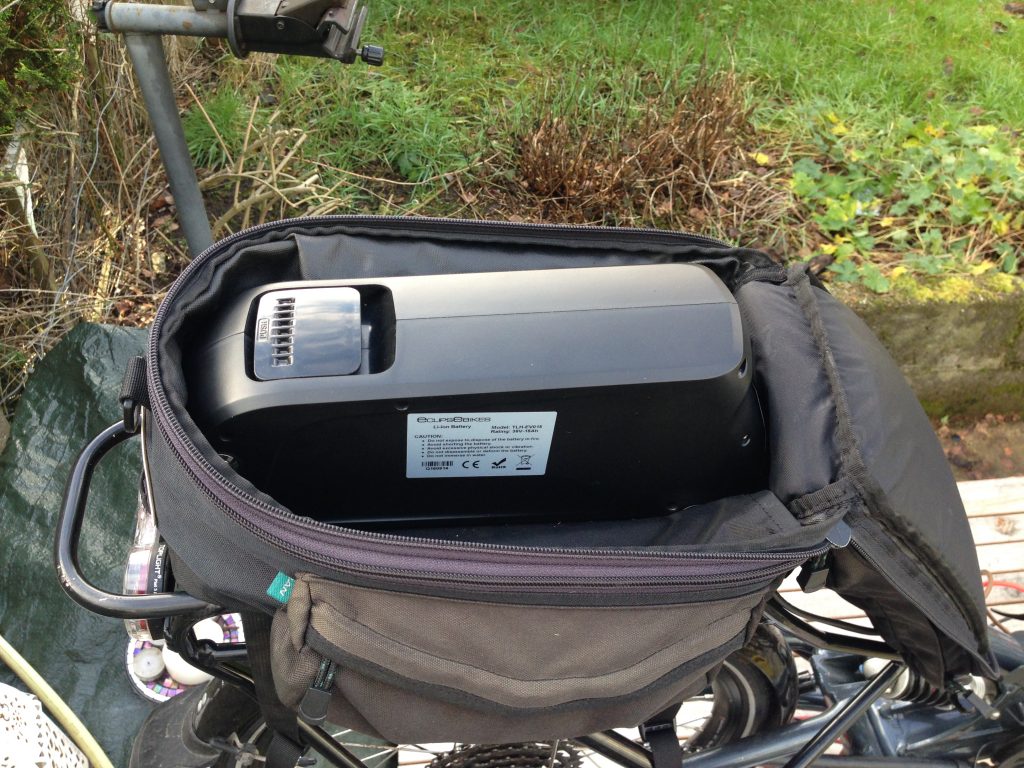
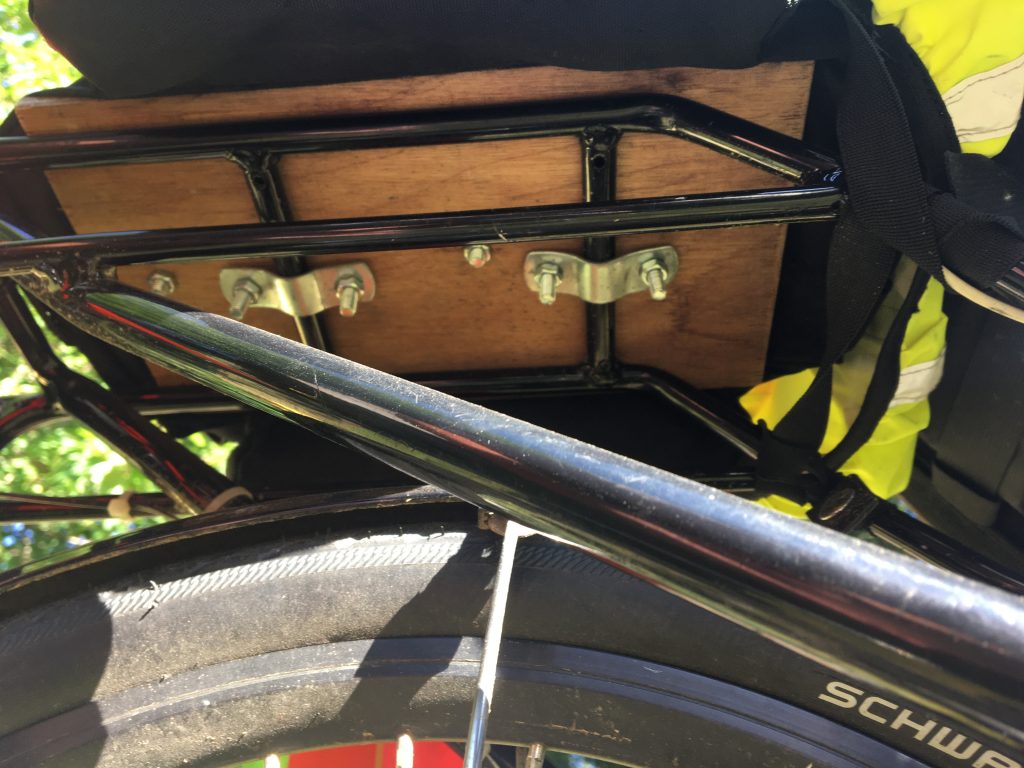
To make working on the trike easier, I made use of our garden table and an axle stand. NOTE: If you want to be able to fold the trike after fitting, make sure there’s enough slack in the cabling to allow for the fold.Once the trike’s bottom bracket is removed, the motor with bottom bracket attached slides in from the drive-side. There’s a retaining bracket to stop the motor rotating within the bb shell and a lockring. Then the chainring and cranks can be fitted. The motor is a 250W one – the lowest power Bafang make, but the only one legal in the UK. Also to be legal you should not have a throttle that can drive the bike without pedalling, and the power must cut out at speeds above 25kmh/15.5mph.I wanted the battery hidden, mounted on the rear rack, so I fixed the battery mounting bracket through the bottom of a rack-bag, using a piece of plywood to the rack to fix the retaining screws into. The bag is supple enough to allow me to slide the battery off it’s mounting bracket and remove for charging and storage. There’s room down either side of the battery for some bits, like tubes and a waterproof etc. This battery has a USB socket, so I ran a 2 metre Apple iPhone charging lead from the bag to the front of the trike along with the power supply.The underside of the rack, showing the wooden mounting ‘plate’ fitting.As the kit is designed for conventional uprights, the wiring to the battery needed extending.The left hand steerer. The control button cable also needed extending, as I wanted the display mounted centrally near the front of the boom. Fortunately, the trike had cable operated brakes, so I could use the levers that came with the kit. They have sensors in to cut the power when either or both brakes are applied. If you have hydraulic brakes, you’ll need to buy brake sensors to fix to the hydraulic brake levers.I mounted the thumb throttle on the right-hand steerer. On the mudguard mount, on the left wheel is the speed sensor. Similar to a trip computer fitting, with a magnet fitted to one of the spokes, this small item needs to work perfectly. If the magnet or sensor move, and stop working, the motor will only provide power for a couple of minutes, then it will shut-down. I have since moved the sensor to the small bracket on the steering arm close to the reflector.There is quite a bit of wiring to keep tidy but a lot is hidden by the seat once fitted. I used lengths of cable management to keep the cables together. I got mine from Maplin, but there’s plenty on Amazon.Once it was all connected, I tested the unit before tidying all the wiring. To fix the display I used on old stem mounted onto the gear stump with a section of unused handlebar I cut down but have since put a lighter handlebar accessory mount in its place.Lots of zip-ties – but they do the job.Everything in place, I used bar-tape over the cables and wires to finish off the bars.
On my first ride out, the motor rotated within the bb shell, even though I thought I had it tight. That pulled on the cable and pulled the main connector apart, and I lost drive. It didn’t take long to sort out.
Since putting it together I’ve ridden several hundred miles without any real issues, though the connection (my extender) to the speed sensor became erratic because it had worked loose, so I soldered the joins rather than just wrapping them… something I should have done in the first place. For the larger cable extension I used plastic-housed screw connectors and wrapped all the connections in waterproof tape.
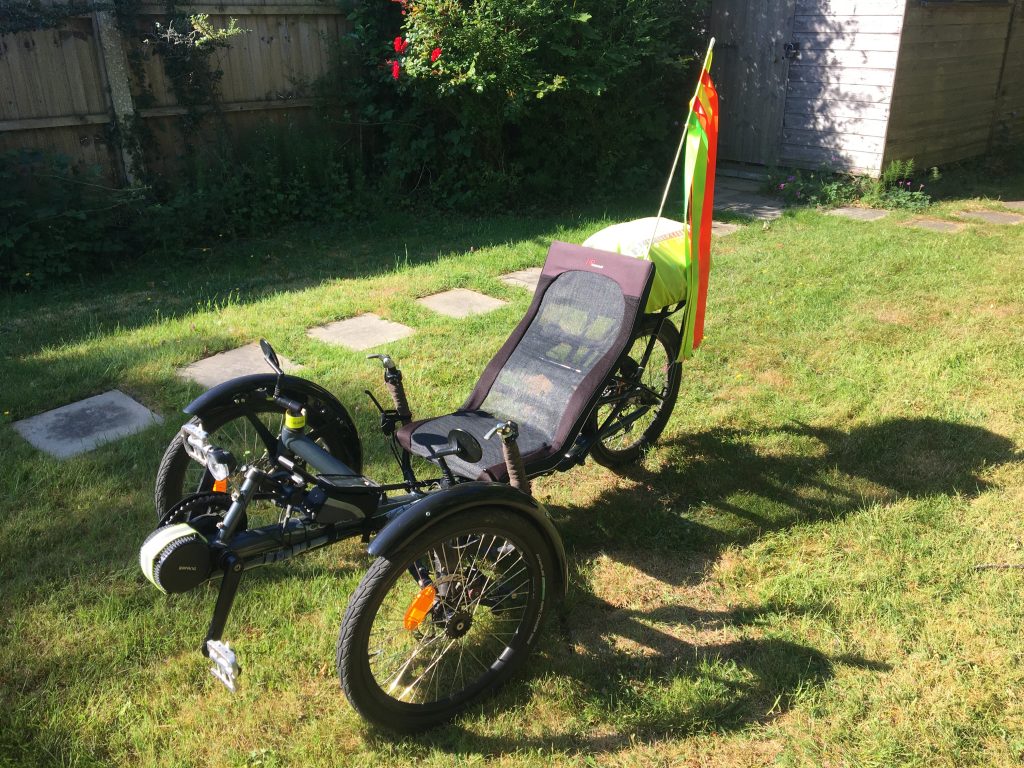
The trike in its form as at June 2020. I added an Airzound airhorn as I had one lying unused in the shed, but I also kept the bell for friendlier encounters, as the Airzound is loud and aggressive. Generally drivers give me a lot more space and consideration on the trike compared to any of our uprights.The Airzound is mounted to one of the seat tubes and the air tube has enough slack to flex with the steering.I mounted a small frame-bag on the boom to house my iPhone when riding, which is kept charged by a cable back to the USB socket on the battery.The arrangement at the front, with a plastic bar accessory mount holding the display. The headlight is connected to a bottle dynamo on the back wheel and the cable runs inside frame and boom.The flag is home-made. I bought some lengths of bright ribbon through Amazon and stitched them to a small plastic flag (also from Amazon) that is meant for kiddies bikes.
After coming back from a long tour of France I decided it was time to put a motor on the Pino. I had mulled it over for some time and, because a new ‘e-pino’ is horrendously expensive, I decided to fit a Bafang ‘Fun 8’ mid-drive motor. In the UK we are legally limited to 250W maximum power.
I bought the motor and battery together, from ‘Aliexpress.com’ and ordered it from China, as it’s cheaper than using a European supplier, but delivery times are longer. If you are in a hurry for the kit, a UK or European supplier will get it to you sooner.
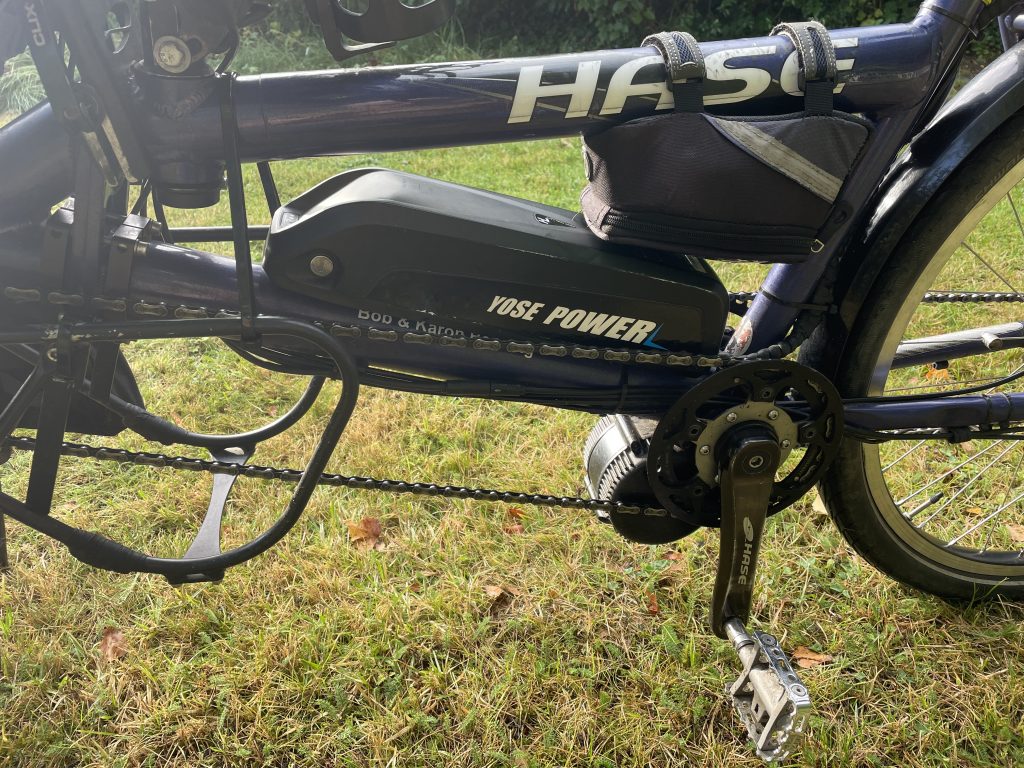
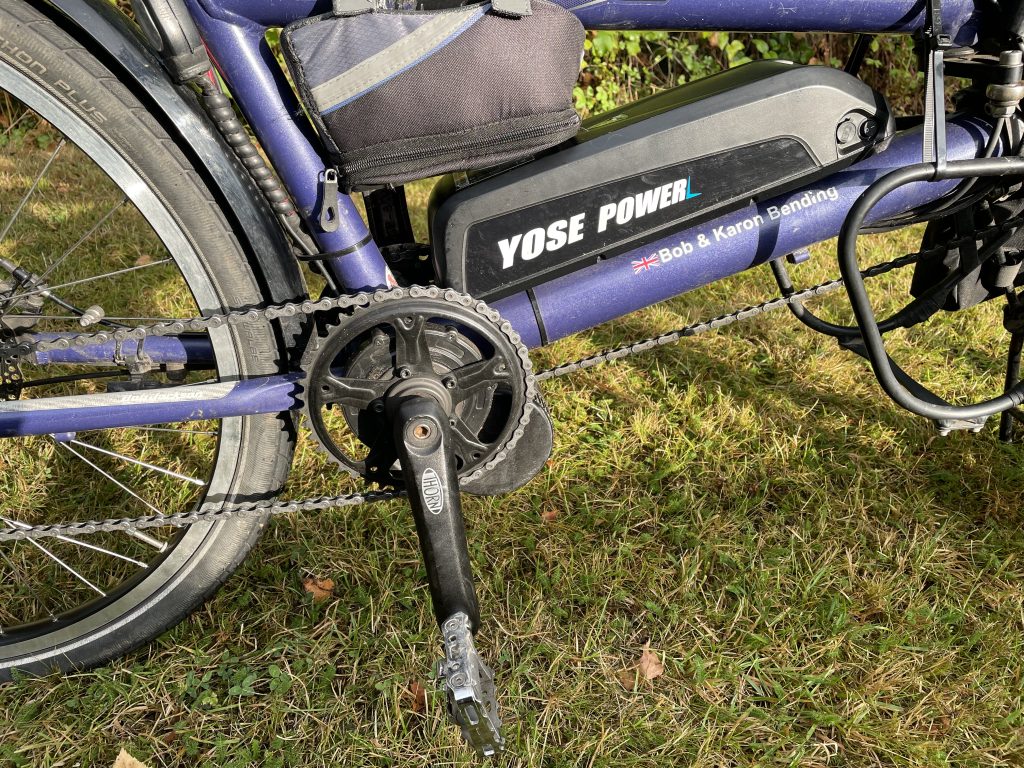
The battery is a 36V 17.5Ah. Cable brake levers come with the kit but sensors for hydraulic brakes are available. The standard chainring seems to be a 44T but at a pinch and with an adapter plate, a 38T could be fitted. Larger rings are not an issue.
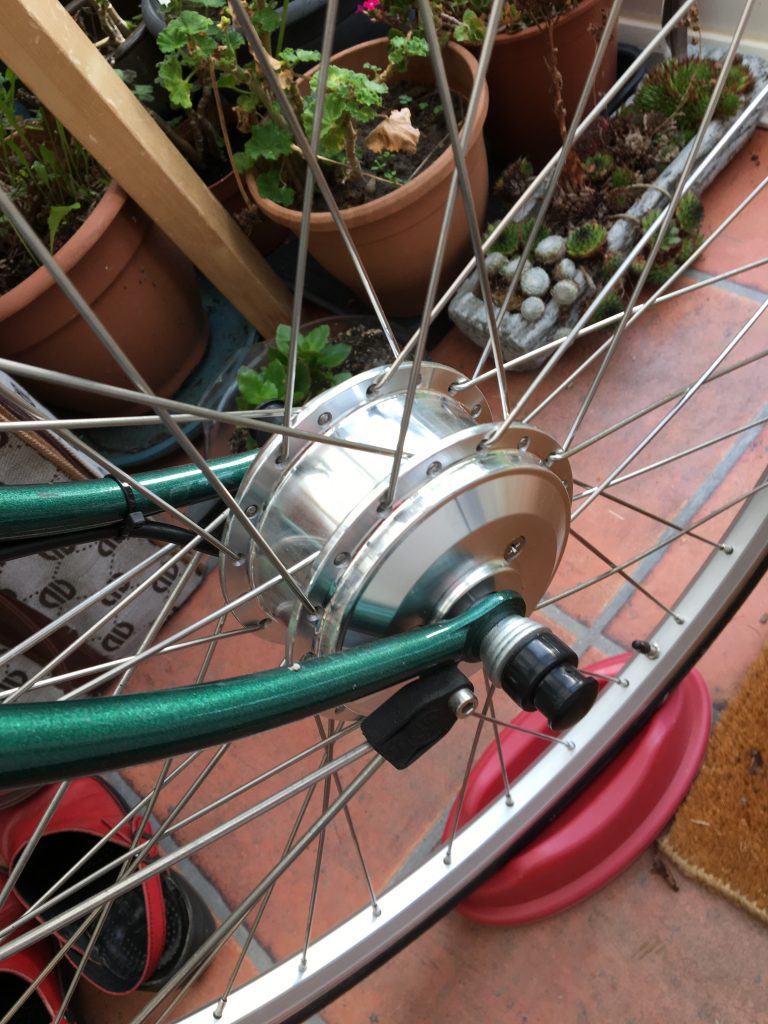
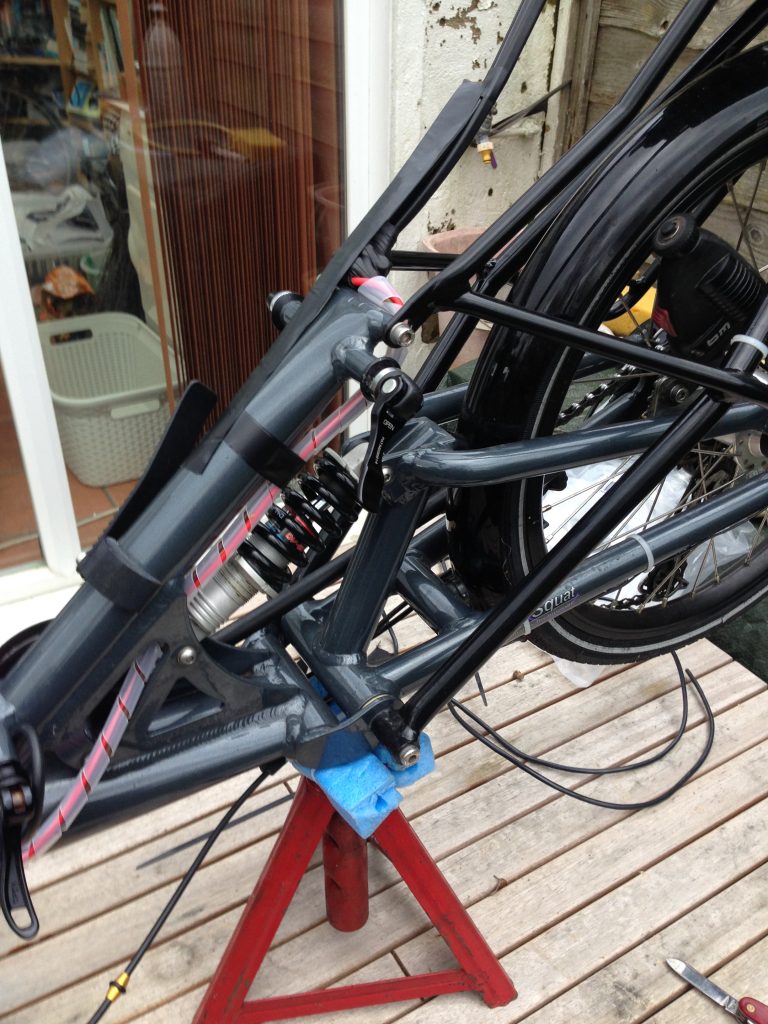
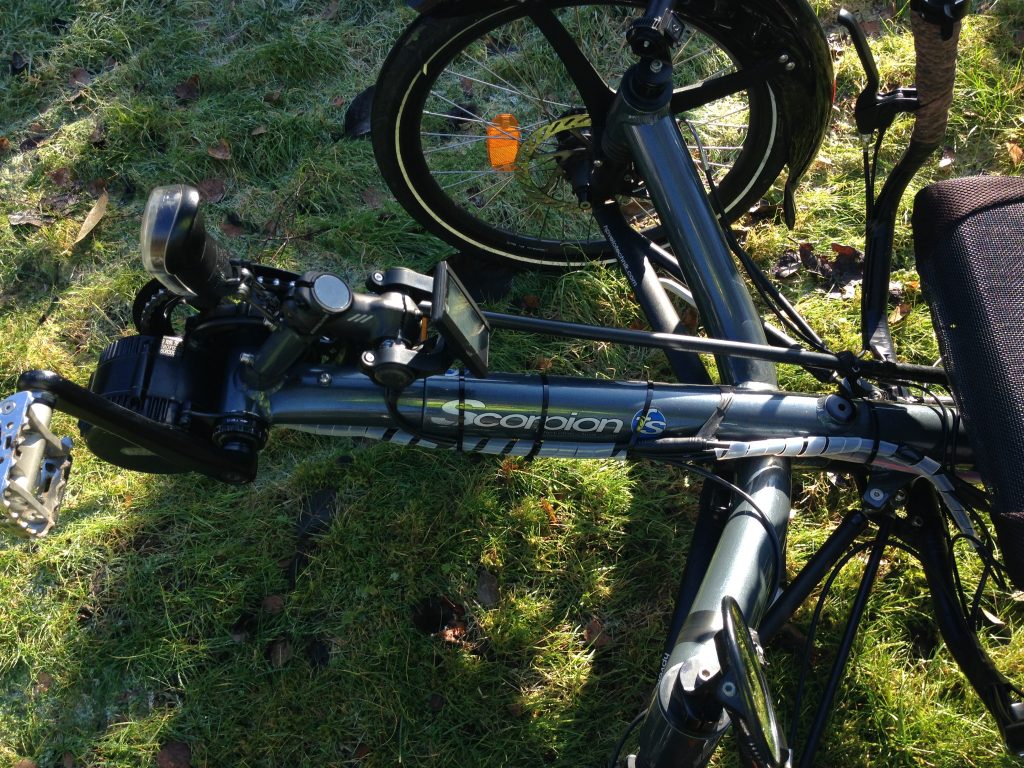
The left-hand Hase crank with freewheel and the motor sitting under the BB shell. The original battery lost much of its performance after 4 years good use, so the one here is a new replacement, but 13Ah, not 17.5Ah of the original.
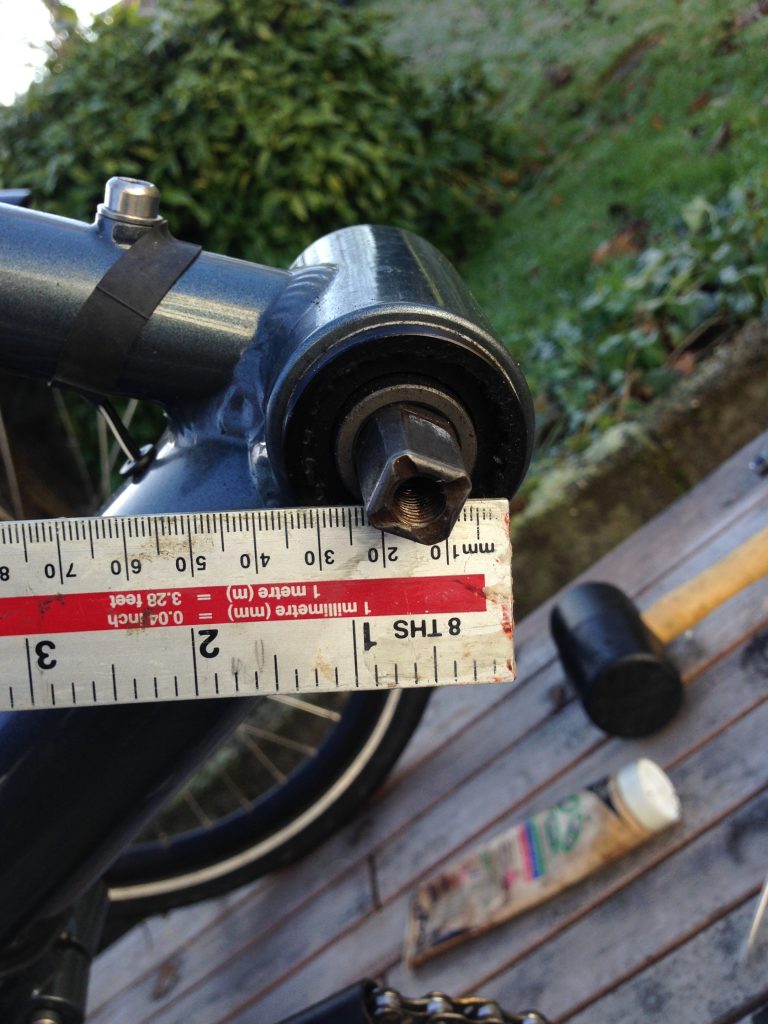
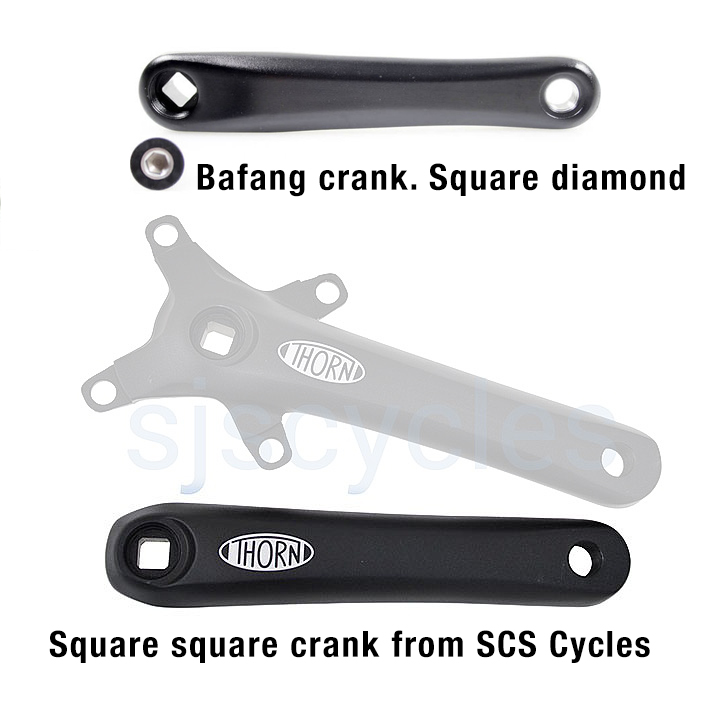
The Hase crank has a square taper axle – in what I call a ‘square, square’ pattern. The Bafang cranks supplied in the kit are ‘square, diamond’ pattern, so, in order to retain the Hase freewheel, you need to source a ‘square, square’ right hand crank. These are available as a Tandem Captain’s crankset from SJS Cycles. You will have to buy the crankset, as they don’t sell individual R/H cranks.
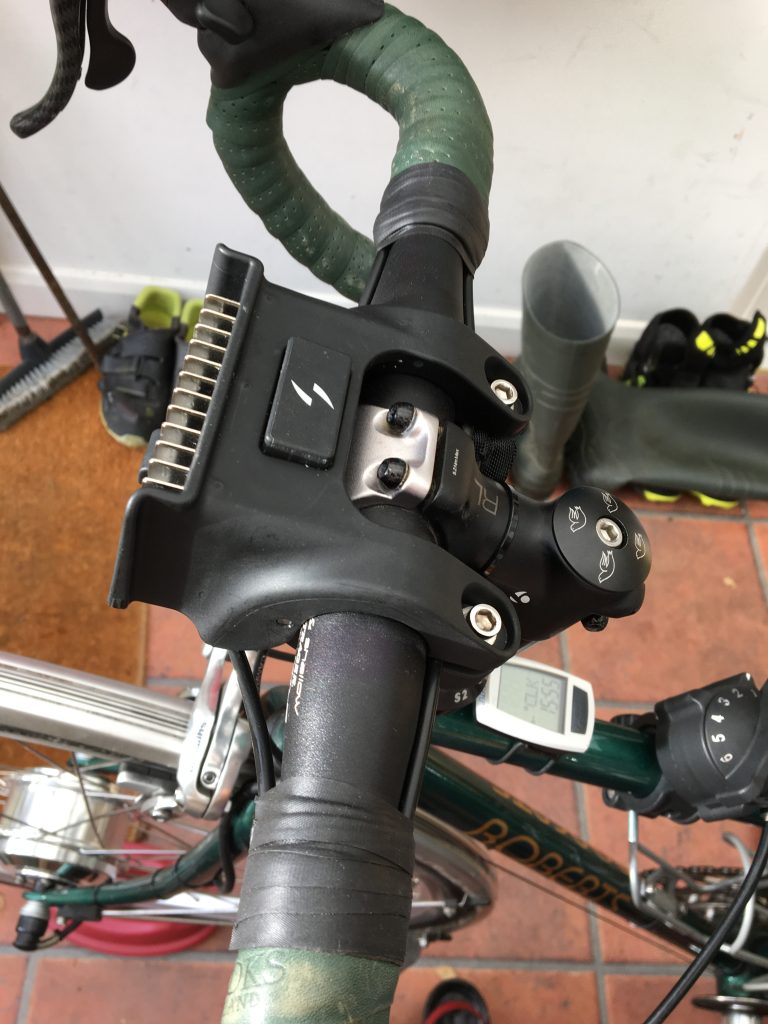
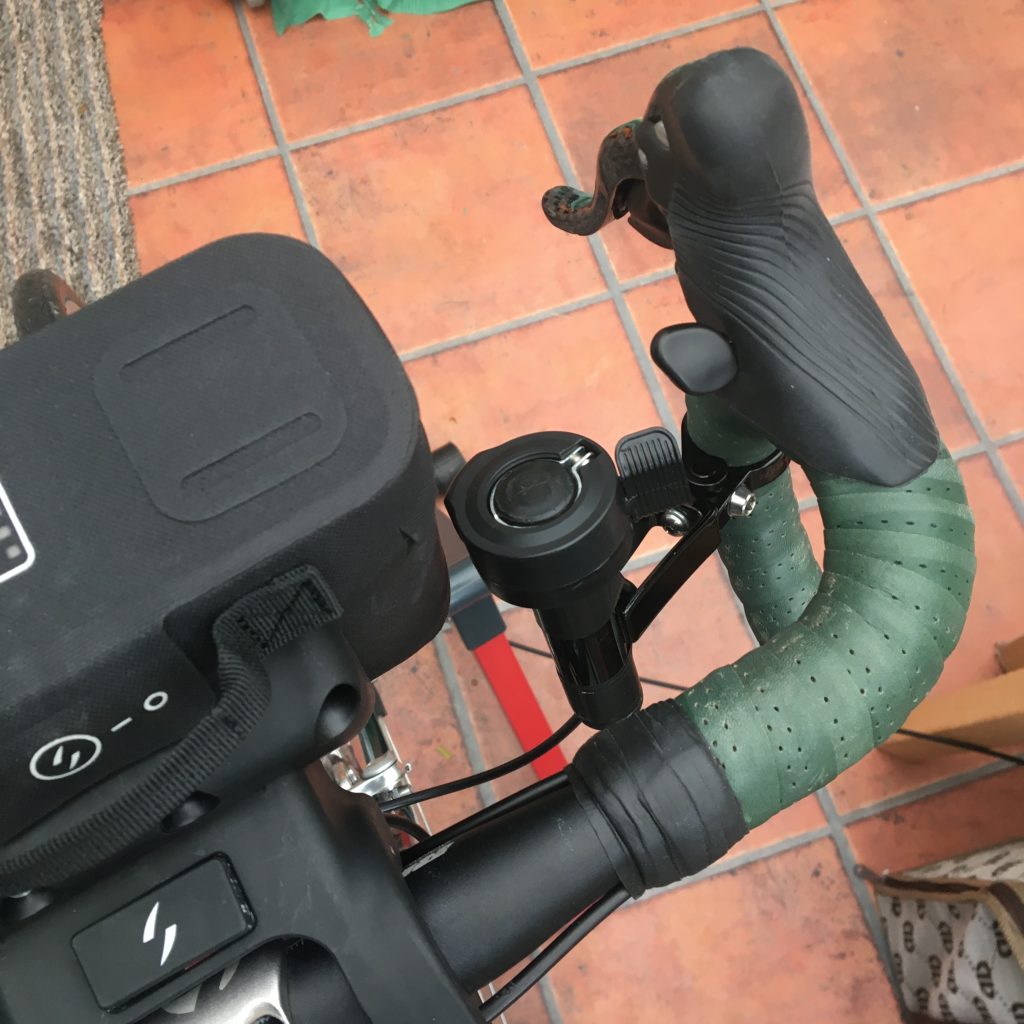
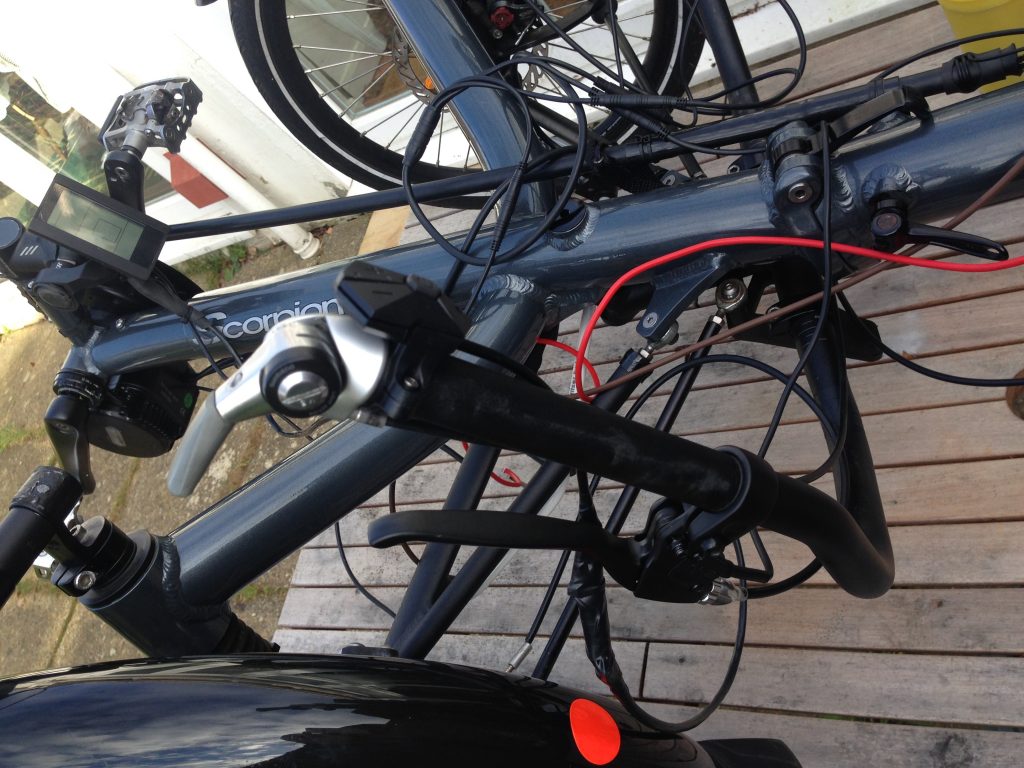
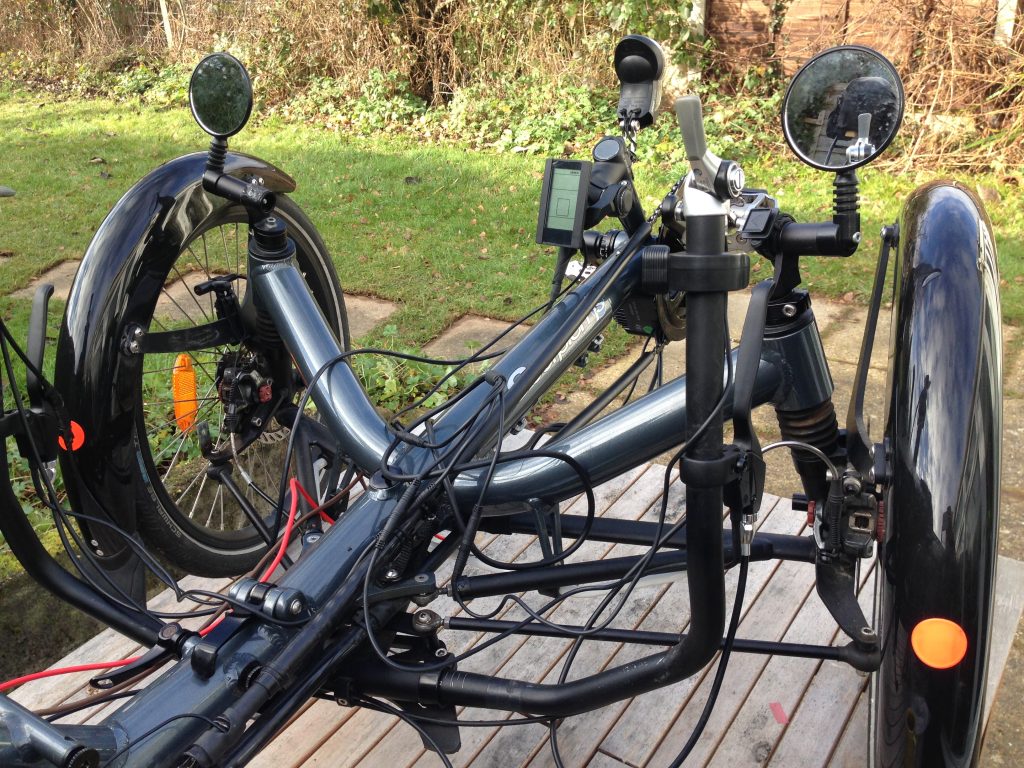
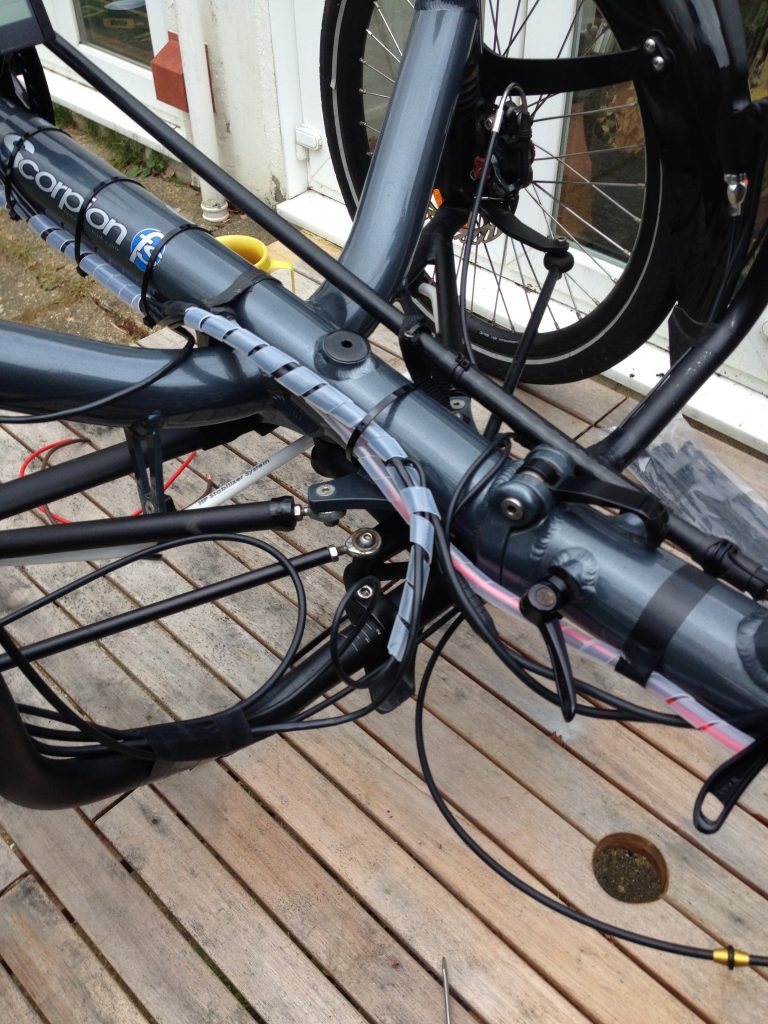
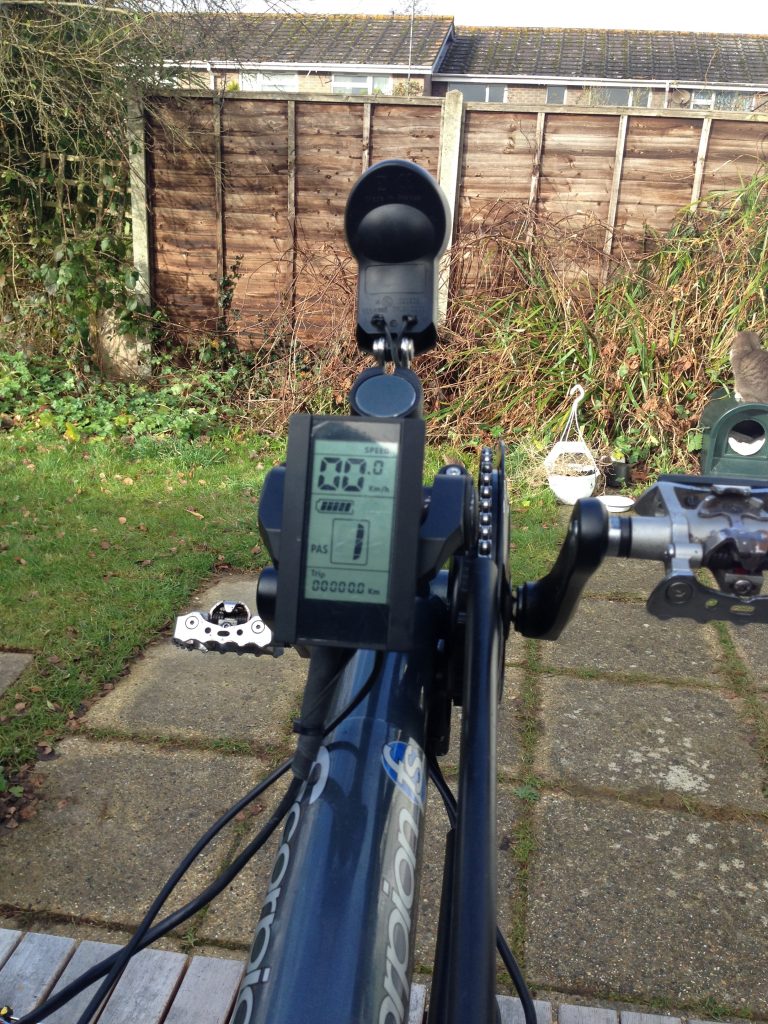
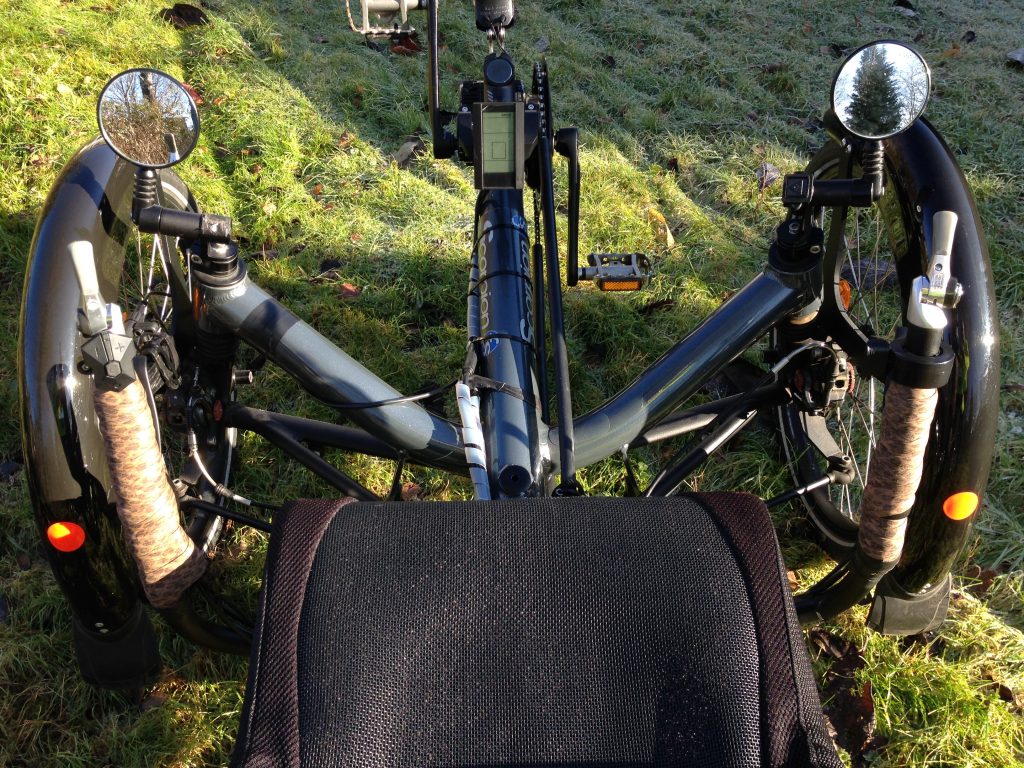
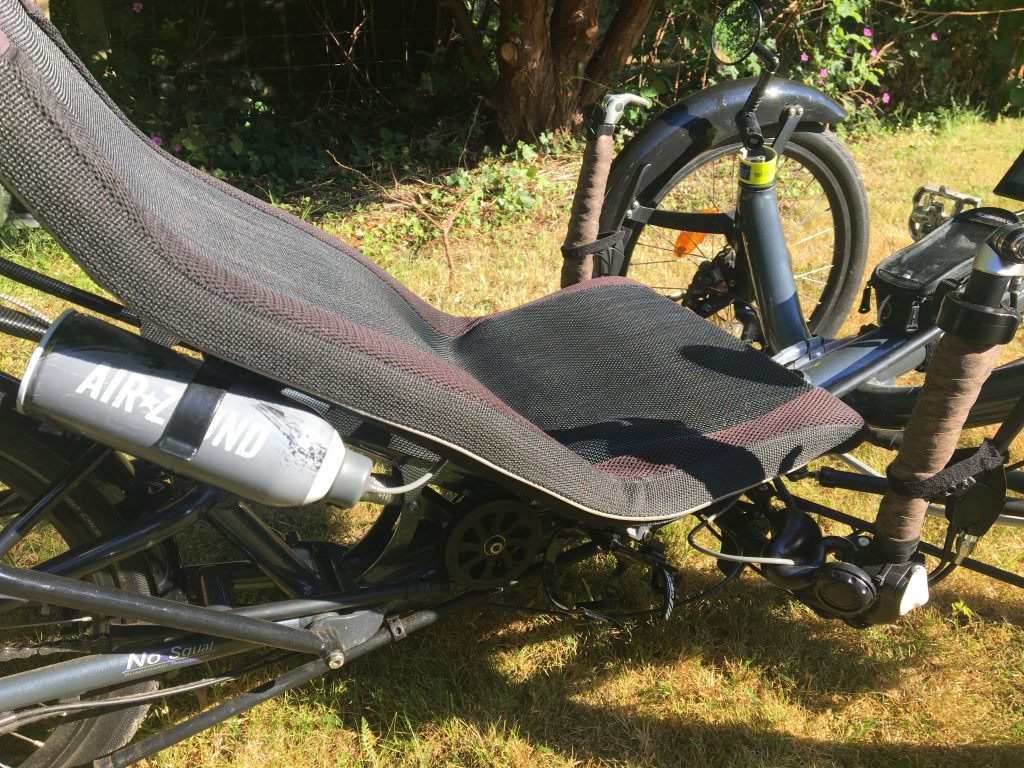
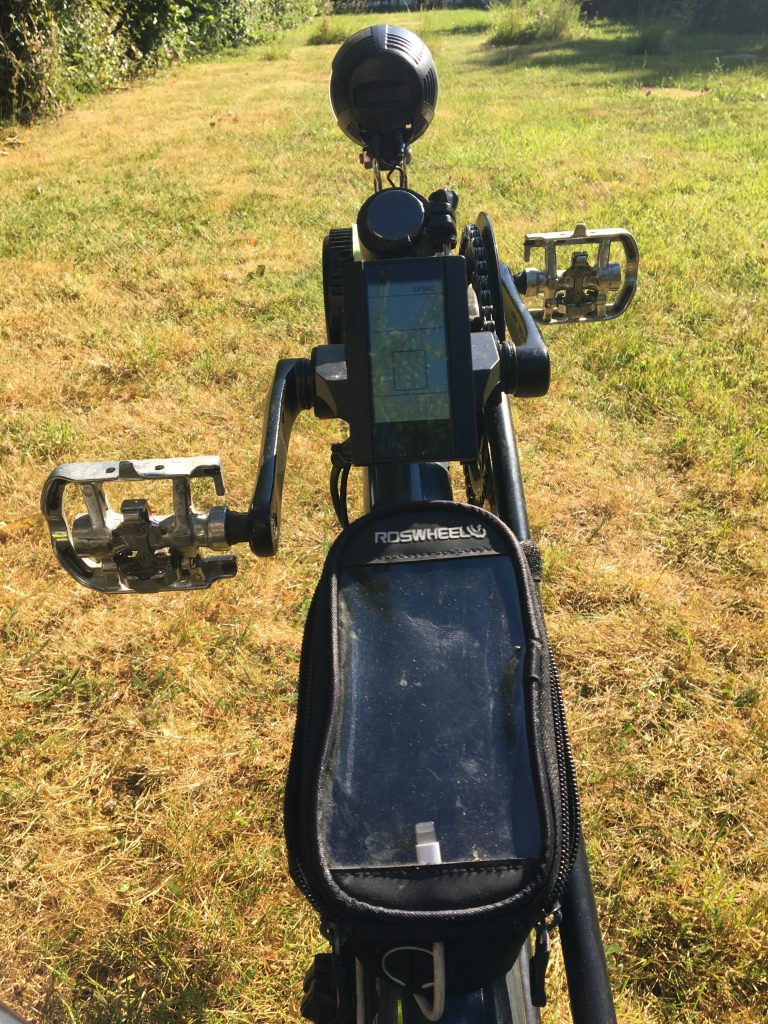
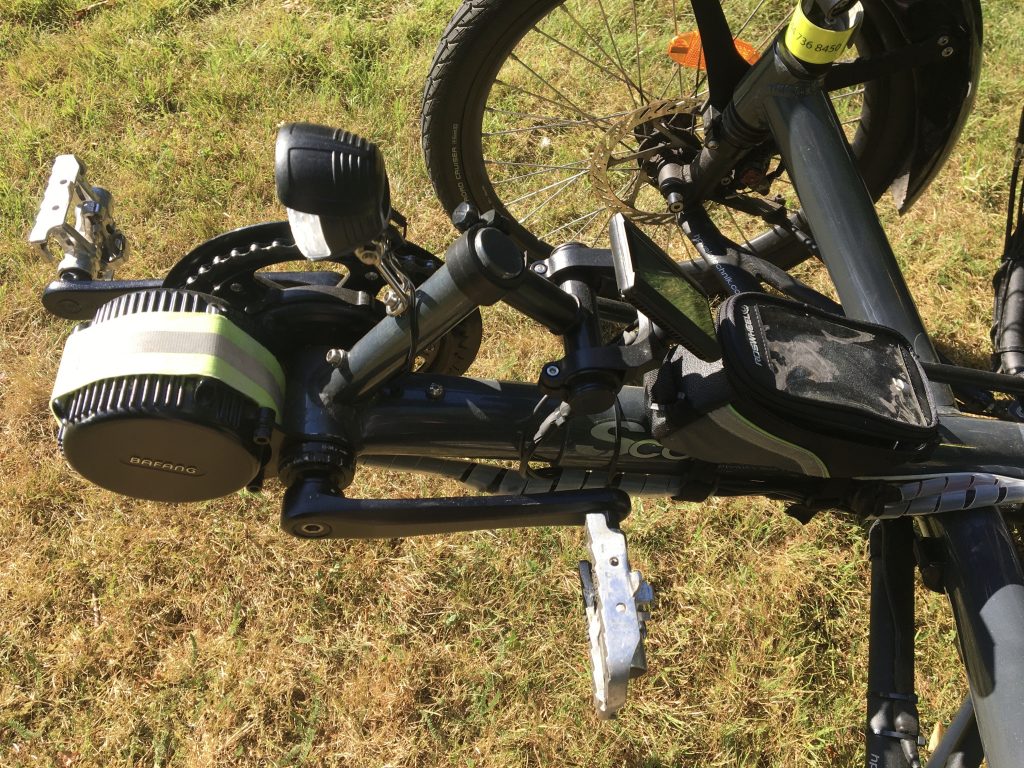
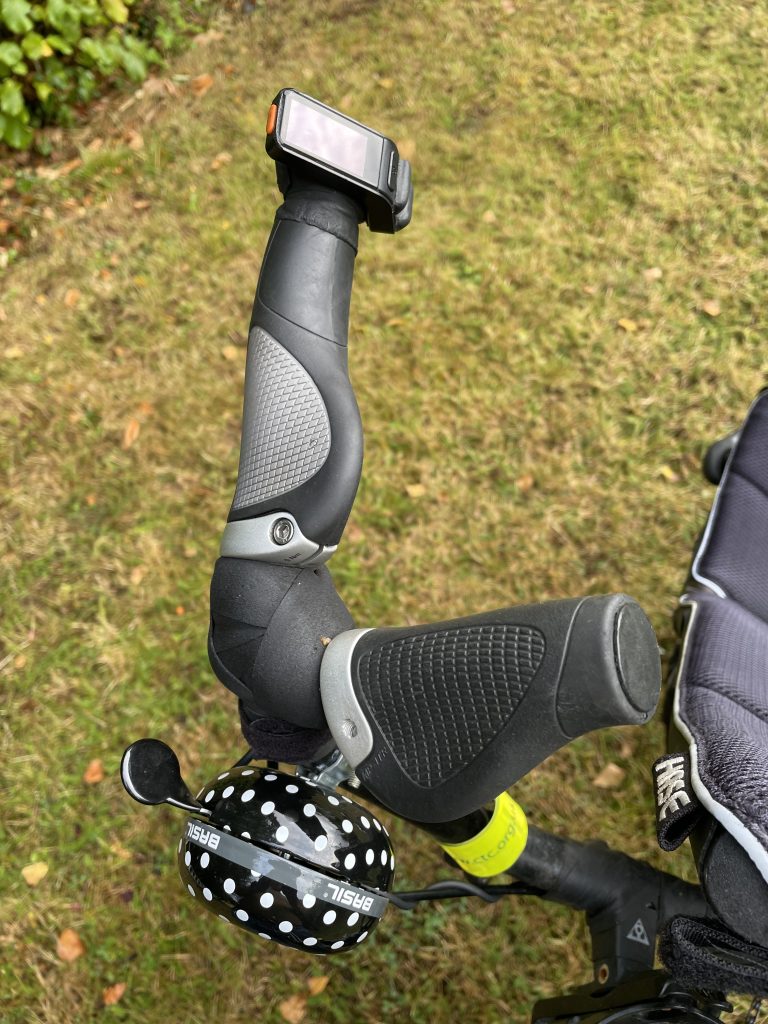
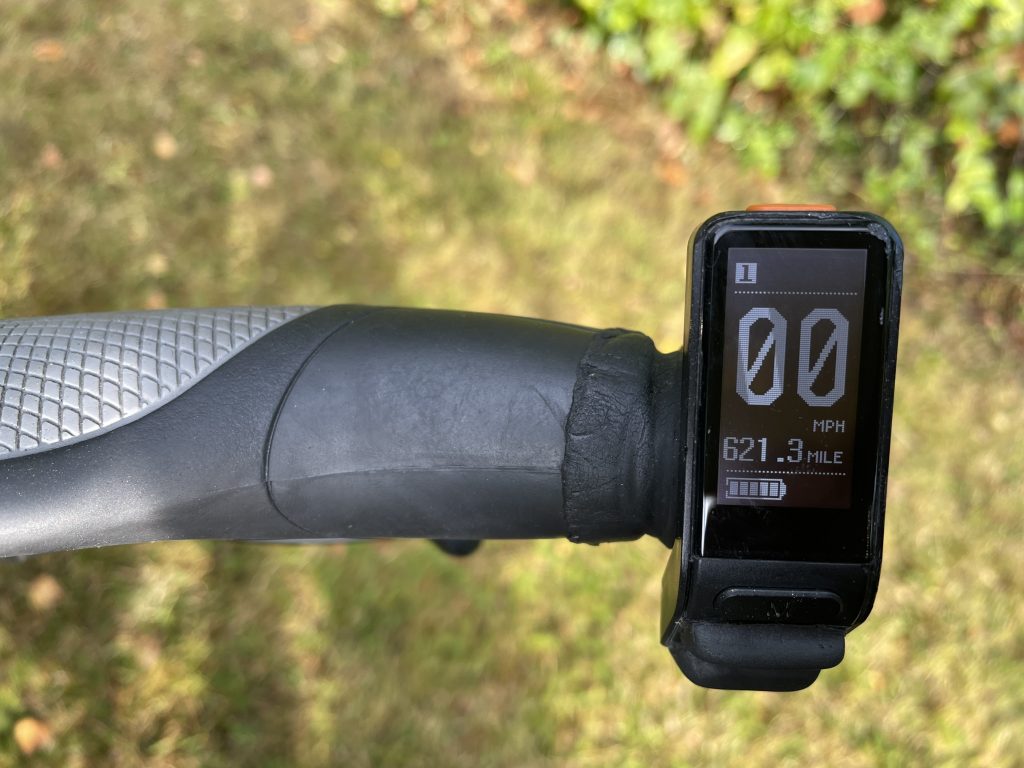
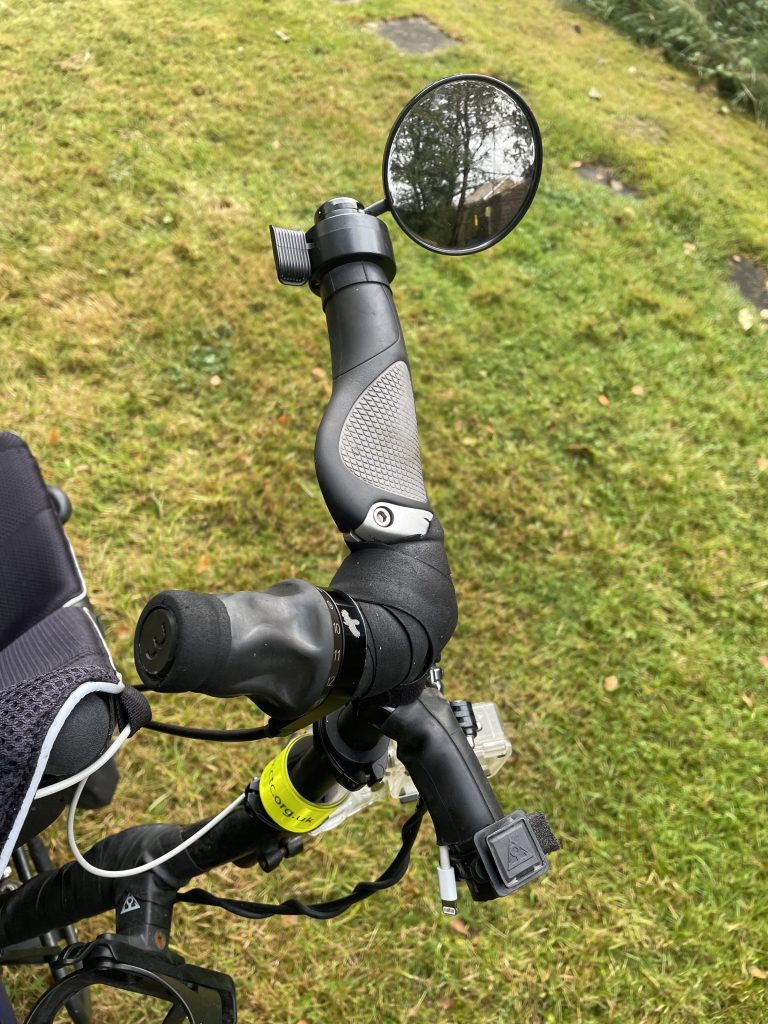
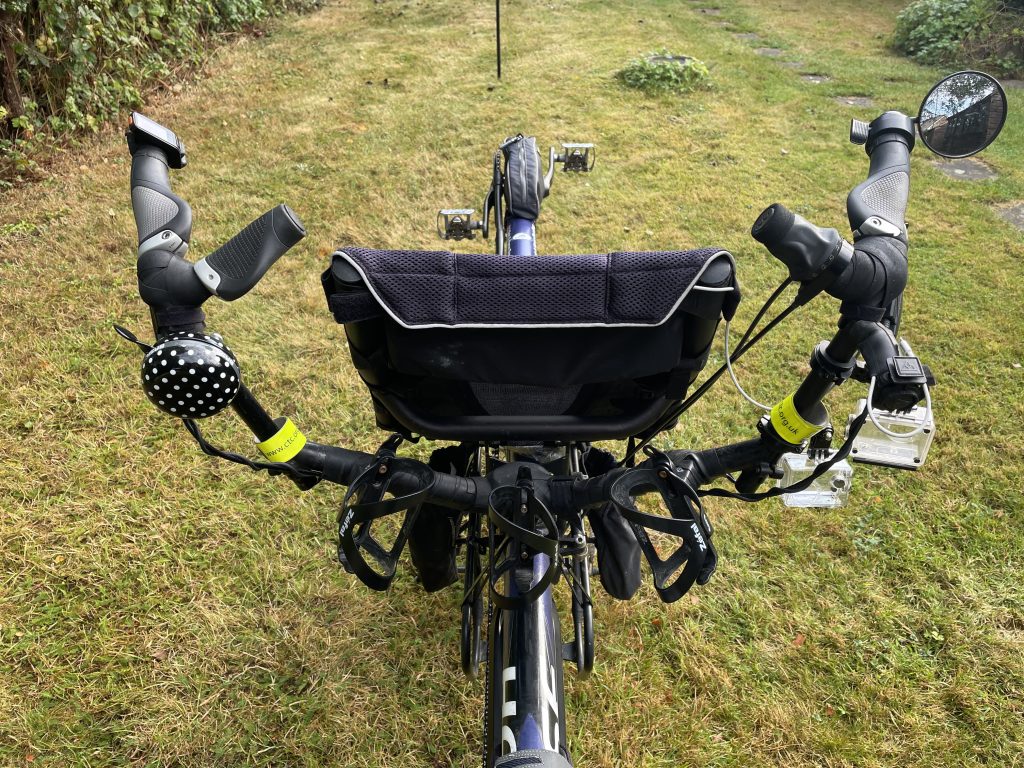
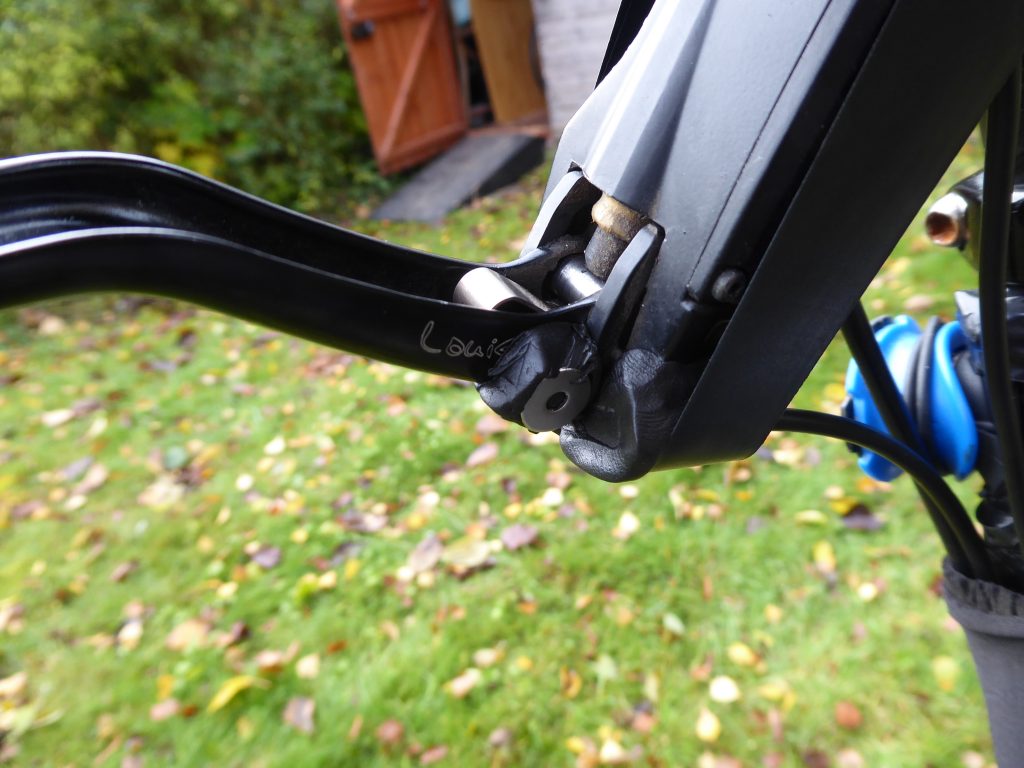
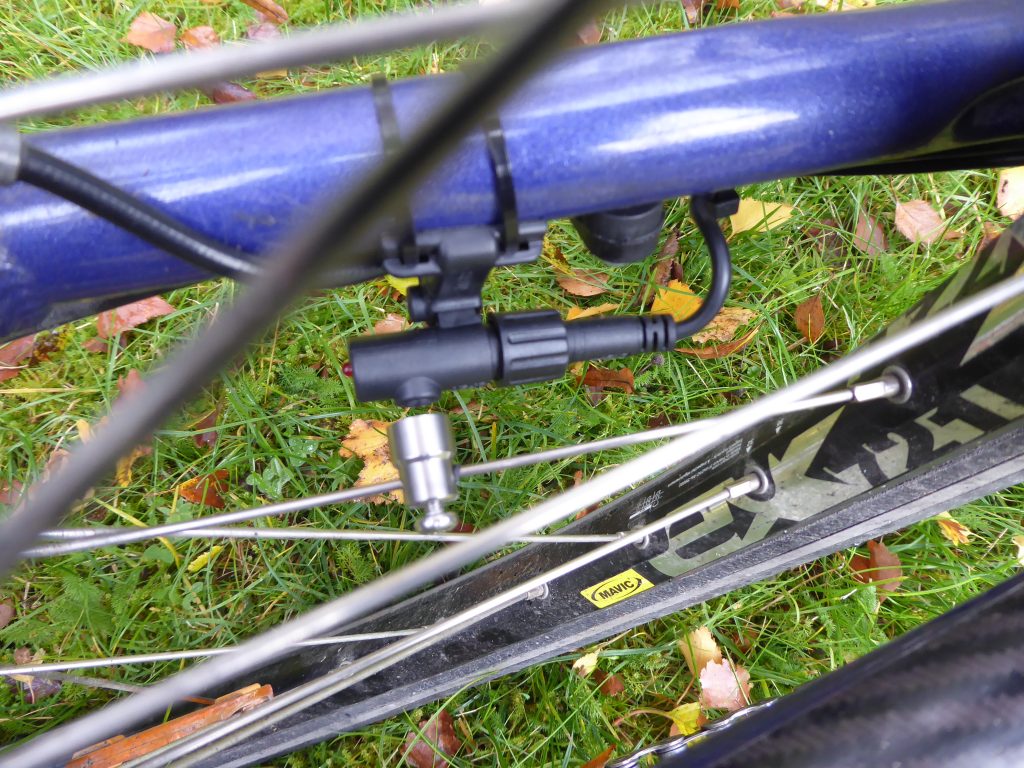
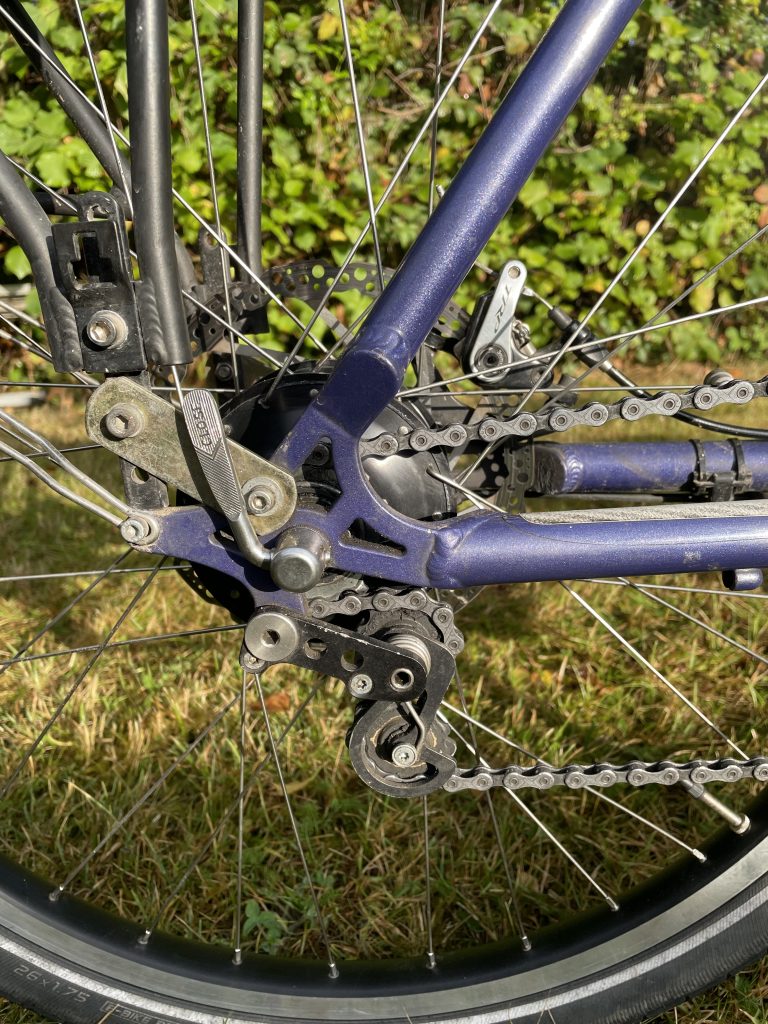
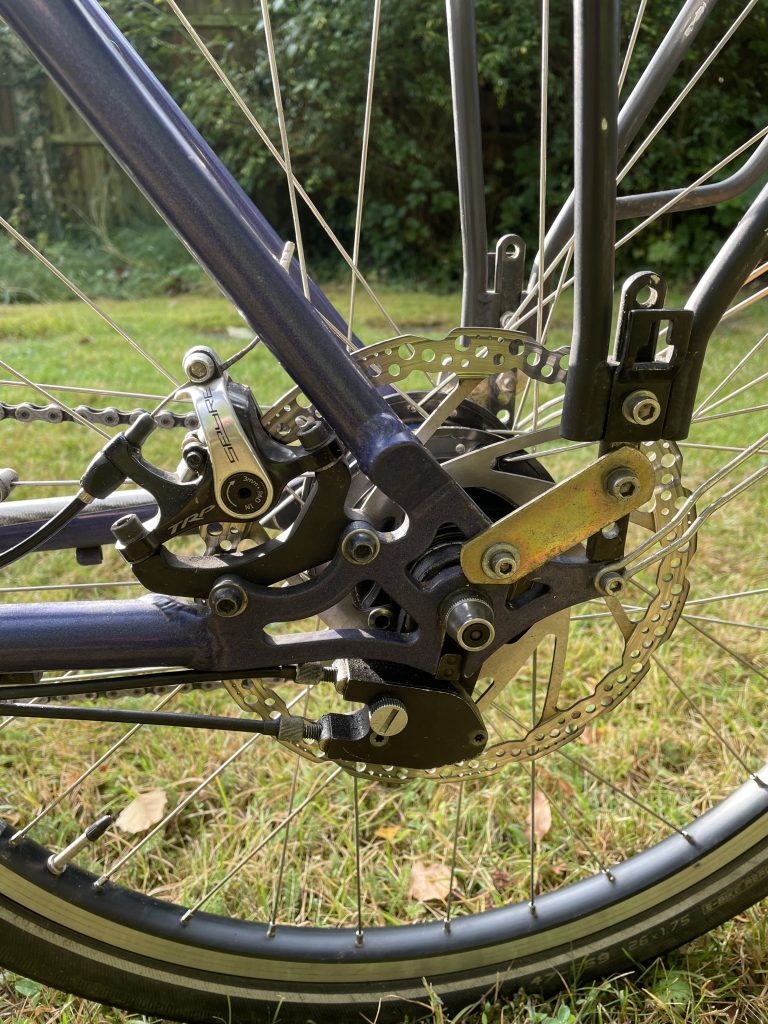
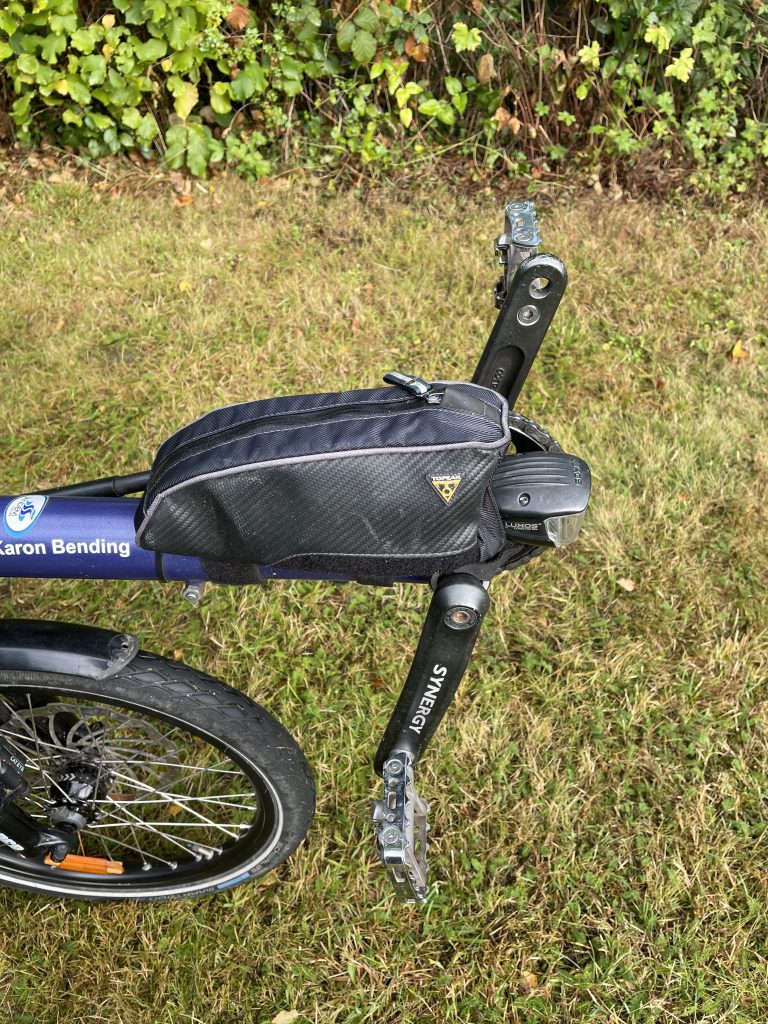
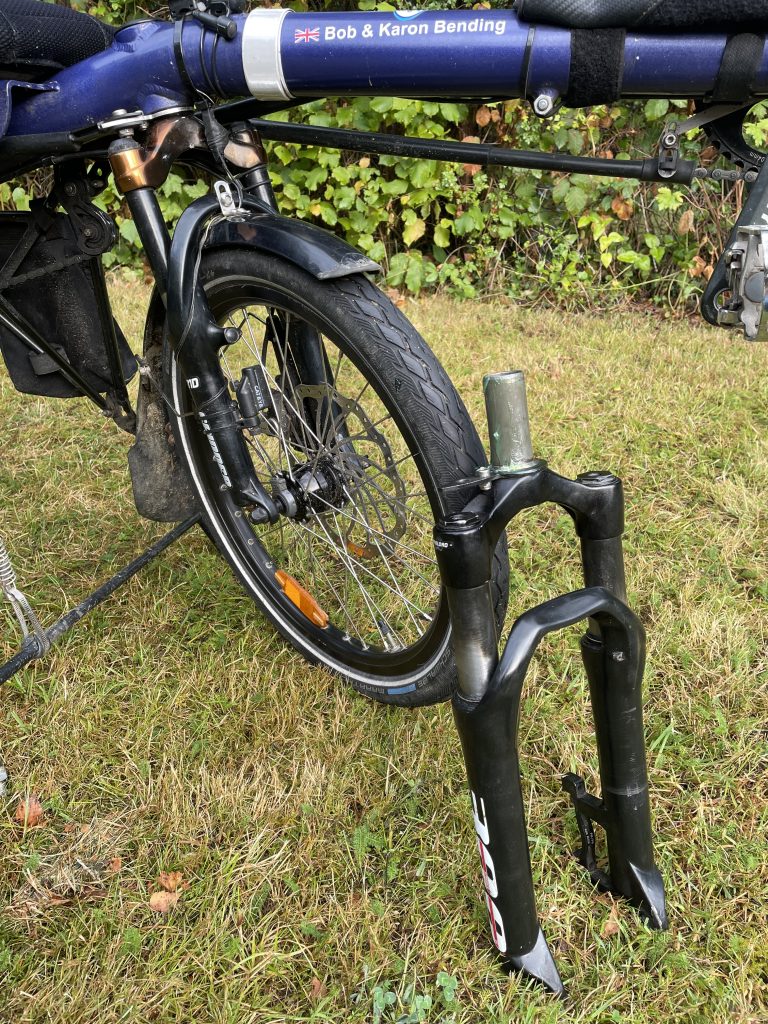
The ‘Square, square’ hole in the Thorn crank matches the hole pattern in the Hase Pino freewheel crank. Our Pino is 2011. Hase may now use a different crankset, so it’s worth checking before you buy.The Thorn, right-hand crank from SJS Cycles and the 44T covered chainring. You can specify different sized chainrings but we’ve found, coupled to a Rohloff with 15T sprocket, it’s a good size that allows us to climb well and keep pedalling up to 25-30mph.The SW102 controller/display on the left bar. This is not the standard display that comes with most kits but there’s no suitable place for the stock display on the Pino, so I ordered this smaller unit. I added the lumps to the buttons, as selecting up/down on the unmodified rocker switch was tricky with gloves on. Changing power levels is very easy using one’s thumb on the up/down buttons. The cable goes down the inside of the bars for a tidy look. I used bar tape to cover the brake lever clamp as it was uncomfortable in its natural state.The display is very simple with just a power level (1-5), speed, odometer (which I never bother with) and battery capacity indicator. Holding the ‘Up’ button down switches on the rear light – powered from the motor. Our front light is permanently on from a hub dynamo.The thumb throttle at the bar-end on the right bar. I used a stumpy bar-end to support the Rohloff grip shift but as it is effectively on the left, I bought a left-hand grip shifter, so the changing order was not reversed, as it would be with the stock right-hand shifter. A second bar-end fitted lower holds a Topeak Dry bag for my iPhone which I use to navigate and track rides with. The charging cable is connected to a power bank in the pocket behind the stoker’s seat.There’s a lot of accessories on the bars. Left to right… Display/control, Ergon grips, bar-end, bell, 3 x water bottle cages, camera mounts front and rear, bar-end for phone holder and waterproof case, Rohloff grip shift on bar-end, Ergon grip, thumb throttle and mirror.The magnet mounted to the brake lever and the sensor, mounted to the brake lever body so that pulling on the brakes cuts the power to the motor. I used the very useful mouldable glue ‘Sugru’ for the job. It sets in about 24 hours, so a little tape was necessary to keep all in place while the glue set. The brake sensors were extra, but the cables fit in place of the cable brake levers supplied with the kit. All the cables on the kit have different colours for matching male/female connectors as well as different pin patterns, so it’s pretty well impossible to make a wrong connection. I have since replaced the hydraulic brakes with cable ones, and therefore switched the levers for the ones that came with the kit. These have built-in sensors.The wheel sensor and magnet on the rear wheel. These need to be fitted and aligned well, as if they don’t work, the motor will cut out after a couple of minutes if it’s not registering any rotation.
Extras
The Rohloff chain tensioner.TRP Spyre cable operated rear brake and Rohloff ‘click box’. I needed to fit the rear rack with a rearward extension to prevent my heals hitting the panniers when riding.Karon uses a Topeak cross-bar bag to keep a few items that are easy to get to.The original Spinner Grinder forks on the bike needed a thorough service so I removed them and replaced them with new Spinner 300 forks now supplied by Hase. These are actually about 20mm longer than the originals. With plenty of time, I stripped the originals, cleaned and re-greased them then put them aside. Recently the 300s became very sticky and inefficient, so I put the originals back on and have cleaned and re-greased the 300s ready for the next swap. It’s a 20 minute job to swap the forks.
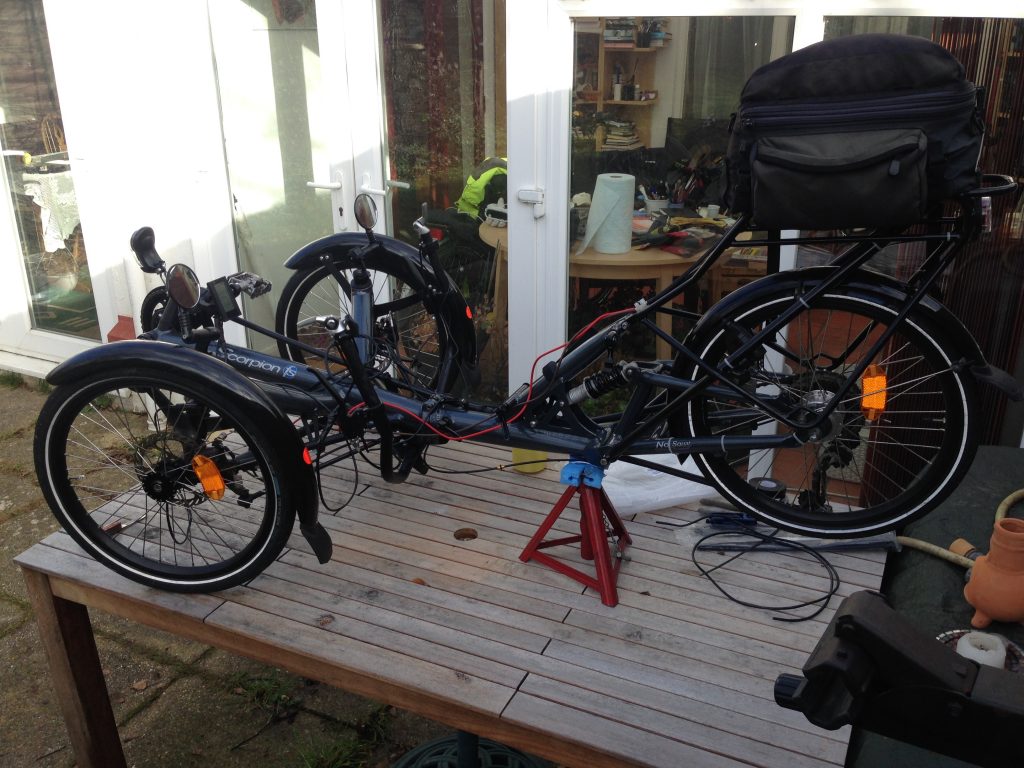
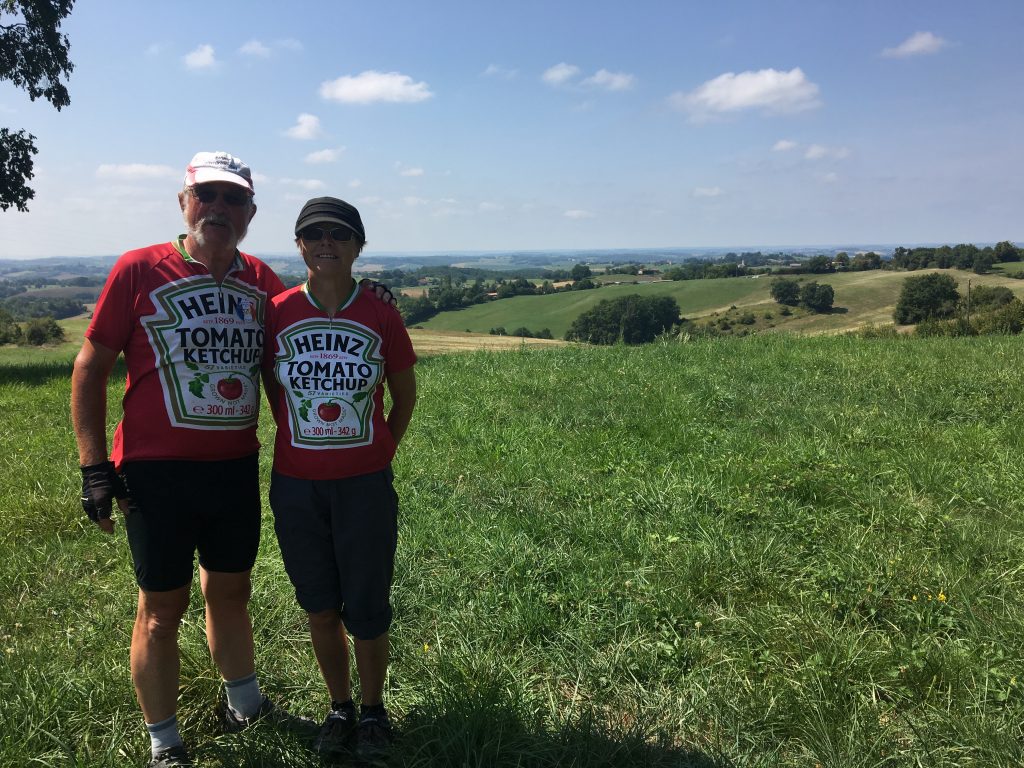
Enjoying the August sunshine of southern france, near Marciac at the International Tandem Rally 2019.
Two and a half years into retirement and we are coping well. We celebrated no more work with a month of tandeming in Germany, down the Rhine, a week with the International Tandem Rally in Oberhausen an der Nahe, then cycling up to Lippstadt for an Army reunion, after which we headed back to the Rhine and followed it downstream to the Hook of Holland and the ferry.
Last year it was Sweden, but a bit too far to cycle we thought, so we drove, stopping in each place for a couple of nights so we could have a day ride before moving on. Sweden was fun with unusually warm weather – which was good – and the island of Öland perfect for riding, though the headwinds were a bit grueling at times.
In December 2018 I was fitted with a pacemaker. After a few years of bradycardia and arrhythmia the docs decided it was time. It took a while to get right, but now it’s settled and I’ve got used to it, I forget it’s there most of the time.
In spring 2019 we headed back to Germany to join Tandemtreffen (TT) for a weekend of tandeming. This was our second TT and just as much fun as the first. We hope to go again in 2020, which will be in the area near the Mosel river.
In the summer of 2019 we set off from home on the 1st July for an epic tour of France, riding to the Mediterranean and on to Toulouse before picking up a car to carry on the the International Tandem Rally at Marciac. After an enjoyable week of cycling within sight of the Pyrenees, we drove back to Caen, dropped the car off and caught an overnight ferry home.
As winter takes a firm grip and Brexit looms, I wonder what will pan out for us in the next few years.